Hardware Assembly
Raspberry Pi - Specific Instructions
The instructions below are specific to the Raspberry Pi and similar style SBCs. For other platforms, users should take into account the mechanical requirements of the SBC they are utilizing. For example, when interfacing the Nvidia Jetson Orin Nano, the pHAT will extend outside of the Jetson's footprint and can't be secured to the base.

Kit Components
Below, are the minimum parts that users will need to assemble the GNSS Flex pHAT on a Raspberry Pi or similar SBC.

Parts List
- x1 - SparkFun GNSS Flex pHAT
- x1 - Tall GPIO Female Headers - 2x20 Pin
- x1 - 50mm U.FL to U.FL Cable
- x4 - Aluminum Hex Standoff
- Thread: M2.5-0.45; Length: 16mm
- x8 - Phillips Machine Screw
- Thread: M2.5-0.45x8mm
External Antenna
In order to receive GNSS signals, users will need a compatible antenna. For the best performance, we recommend an active L1/L2/L5/L6/L-band GNSS antenna for most of our GNSS Flex modules.

Connecting an antenna to the GNSS Flex pHAT.
Tip
For the best performance, we recommend users choose a compatible L1/L2/L5/L6 GNSS antenna and utilize a low-loss cable. Also, don't forget that GNSS signals are fairly weak and can't penetrate buildings or dense vegetation. The GNSS antenna should have an unobstructed view of the sky.
Note
Please keep in mind that these are general suggestions for our GNSS Flex modules. Some of these boards may have multiple GNSS antenna connections, an integrated antenna, support specific frequency bands, etc. For more details on a specific GNSS Flex module, please refer to their hookup guide.
Connection Options
There are two options for connecting an external antenna to a GNSS Flex module:
- An external antenna can be connected through the U.FL connector on the GNSS Flex pHAT.
- However, for a sturdier connection, there is a signal pass-through between the U.FL and SMA antenna connectors on the GNSS Flex pHAT. To utilize the SMA connector, users can bridge the U.FL connections between the boards with a U.FL cable.
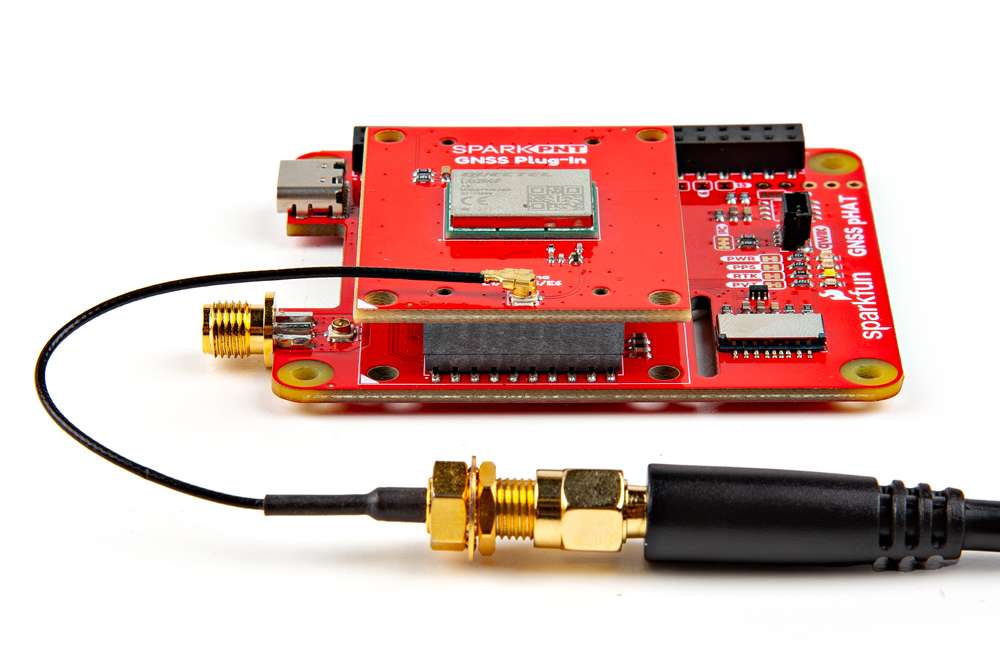
Attaching an antenna directly to the GNSS Flex module with an adapter cable.
Bridging the U.FL connectors on the boards, to utilize the SMA connector on the GNSS Flex pHAT.
Signal Bridge
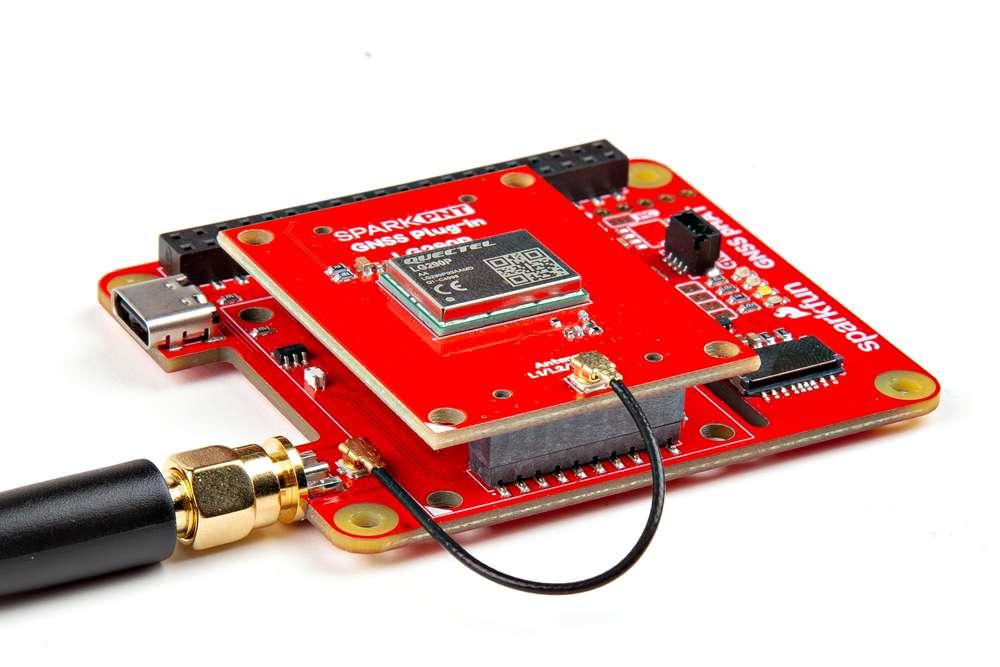
The signal bridge on the GNSS Flex pHAT can be utilized to connect an external antenna to the SMA connector. For the connection to work, an U.FL cable needs to bridge the antenna connection from the GNSS Flex module to the GNSS Flex pHAT. Due to the space constraint, we recommend connecting the U.FL cable to the GNSS Flex pHAT before attaching the GNSS Flex module to the pHAT.

Step 1 - Connect the U.FL cable to the GNSS Flex pHAT.

Step 2 - Attach the GNSS Flex module to the pHAT.

Step 3 - Connect the other end of the U.FL cable to the GNSS Flex module.

A U.FL cable bridging the antenna connection between the boards.
GNSS Flex Module
The GNSS Flex system is a modular ecosystem designed around two 2x10-pin, 2mm pitch headers, so boards are pin-compatible for upgrades and easily swapped for repairs. Users simply, stack a SparkPNT GNSS Flex module onto the headers of its associated carrier board.
SMA Connector
When bridging the antenna connection to the SMA connector of the GNSS Flex pHAT, we recommend attaching the U.FL cable to the pHAT before the GNSS Flex module.
Attaching a GNSS FLex module to the GNSS Flex pHAT.
Board Alignment
The alignment indicator for mating these boards, is annotated with a triangle in the corner of the mating area.
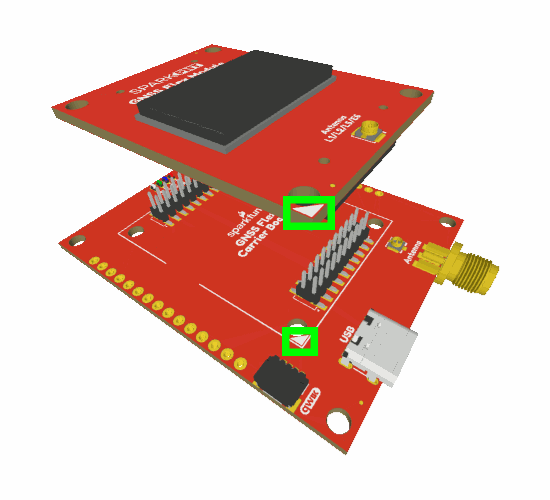
The alignment and connection of a SparkPNT GNSS Flex module on top of a carrier board.
Assemble pHAT
Before assembling the mechanical hardware for the GNSS Flex pHAT, users should consider how the hardware will interface with their Raspberry Pi or other SBC.
- Attach the extension header to the Raspberry Pi or other single-board computer
- Attach the screws and standoffs to the SparkFun GNSS Flex pHAT
- To make things easier, we recommend attaching the standoffs to the pHAT first
- Once attached, users can stack the pHAT onto the Raspberry Pi or other single-board computer
- For a more permanent installation, users can also secure the pHAT to the SBC from the base
Header Extension
When assembling the GNSS Flex pHAT, users should utilize the extension header that best suits their needs.

Attaching the extension header to the GPIO pins on a Raspberry Pi.
Stacking Multiple HATs

Selecting an Extension Header
- Tall GPIO Female Headers - 2x20 Pin
- These are the same extension headers included in our GNSS Flex pHAT kits.
- These headers are just long enough to attach a Raspberry Pi HAT/pHAT and are great if you are looking to maximize the amount of airflow beneath the pHAT.
- Extended GPIO Female Header - 2x20 Pin (16mm/7.30mm)
- These headers offer the most structural support and are long enough for stacking multiple HATs, but with the spacers it's just a little too tall to match the height of the standoffs in the kit.
- Extended GPIO Female Header - 2x20 Pin (13.5mm/9.80mm)
- These headers are great if users want to stack multiple Raspberry Pi HAT/pHATs.
Standoffs
The standoffs included in the GNSS Flex pHAT kits offer structural support and ventilation space, for attaching the board to a Raspberry Pi. However, an extension header must be used in order to maintain the pin connections of the 40-pin GPIO header from the Raspberry Pi.
When connecting the standoffs, we recommend attaching them to the GNSS Flex pHAT first. However, users should leave the screws a little loose to account for minor tolerances in the mechanical assembly.

Attaching the standoffs to the GNSS Flex pHAT with a screwdriver.

A more effective method for initially connecting the standoffs.
Once users have attached the standoffs to the GNSS Flex pHAT, it can be stacked onto the GPIO header of the Raspberry Pi and secured to the board.

Attaching GNSS Flex pHAT to the extension header on the GPIO pins on a Raspberry Pi.

Securing the standoffs to the base of the Raspberry Pi.
USB Connector
If the GNSS Flex module has the capability, a USB-C connector is provided on the GNSS Flex pHAT to interface with the GNSS receiver. However, depending on the software support of the GNSS receiver, users can either interface with the GNSS receiver directly from the Raspberry Pi or externally from another computer.

Connecting the USB interface of the GNSS Flex module directly to the Raspberry Pi.

Connecting the USB interface of the GNSS Flex module to an external computer.
SD Card Slot
If the GNSS Flex module has the capability, an SD card slot is provided on the GNSS Flex pHAT for data logging.

Jumpers on the bottom of the GNSS Flex pHAT.
Qwiic Devices
The Qwiic system allows users to effortlessly prototype with a Qwiic compatible I2C device without soldering. Users can connect Qwiic sensors or boards with just a few Qwiic cables. (The example below, is for demonstration purposes and is not pertinent to the board functionality or this tutorial.)

A Qwiic OLED display connected to the GNSS Flex pHAT.