Software Overview
CH342 USB Driver
The USB drivers for the CH342 USB-to-Serial converter can be downloaded from the manufacturer's website.
- Windows: Download Page for
CH343SER.EXE - MacOS: Download Page for
CH341SER_MAC.ZIP
A USB driver is not required for Linux based operating systems.
Once the USB driver is installed, two virtual COM ports will be emulated, which can be used as standard COM ports to access UART interfaces of the IM19 attitude module.
Channel A:UART1of the IM19 attitude moduleChannel B:UART2of the IM19 attitude module
The UART ports of the IM19 attitude module have the following default configuration:
- Baud Rate: 115200bps
- Data Bits: 8
- Parity: No
- Stop Bits: 1
The breakout board also includes a digital switch, to isolate the CH342 and allow users to access these UART ports through their breakout pins. To activate the digital switch and utilize the UART ports through their breakout pins, users can close the CH342 EN jumper or pull theCH342 EN pin LOW. This disables the CH342 and disconnects the CH342 from the UART1 and UART2 ports of the IM19 attitude module, avoiding any bus contention issues.
AT-Commands
Below is a summary of the AT commands supported by the IM19 attitude module. The AT-commands are case-sensitive and need to be sent in a single string; therefore, when using a terminal emulator, it is recommended to utilize one that sends a string of characters instead of each character as they are typed.
| AT Command | Description |
|---|---|
AT+SYSTEM_RESET | System reset |
AT+SAVE_ALL | Save the parameters |
AT+UPDATE_APP | Update module firmware, see attachment for protocols |
AT+UPDATE_BOOT | Update Bootloader,see attachment for protocols |
AT+GNSS_CARD= | Set the GNSS RTK receiver type:
|
AT+READ_PARA=SYSTEM/ALL | Read parameters (SYSTEM or ALL) |
AT+LOAD_DEFAULT | Loads default parameters |
AT+AUTO_FIX=ENABLE/DISABLE | Installation angle estimation in tilt measurement applications |
AT+CLUB_VECTOR=X,Y,Z | Set the RTK pole vector to map the position to the end of the RTK pole (units in meters) |
AT+NAVI_OUTPUT=UARTn,ON/OFF | Binary NAVI positioning output for UARTn |
AT+NASC_OUTPUT=UARTn,ON/OFF | Ascii type NAVI positioning output for UARTn |
AT+MEMS_OUTPUT=UARTn,ON/OFF | MEMS raw output for UARTn |
AT+GNSS_OUTPUT=UARTn,ON/OFF | GNSS raw output for UARTn |
AT+LEVER_ARM=X,Y,Z | Set the lever arm (units in meters) |
AT+LEVER_ARM2=X,Y,Z | Set the lever arm, the input value will be automatically adjusted according to the estimated installation angle (units in meters) |
AT+CHECK_SYNC | Query whether time is synchronized between MEMS and GNSS |
AT+HIGH_RATE=ENABLE/DISABLE | High-rate mode setting |
AT+ACTIVATE_KEY=KEY | Module activation |
AT+ALIGN_VEL=1.0 | Set the initial alignment speed threshold |
AT+VERSION | Query the Firmware version |
AT+GNSS_PORT=PHYSICAL_UARTn | Set the physical serial port on UARTn, for communicating with the GNSS RTK receiver. Save the Settings and restart to take effect |
AT+WORK_MODE=X | Set the module working mode |
AT+INSTALL_ANGLE=X,Y,Z | Set the module installation angle (units in degrees) |
AT+THIS_PORT | Query the serial port number |
AT+FILTER_STOP=ENABLE/DISABLE | Causes the filter to enter or exit stop mode |
AT+LOOP_BACK=UARTn/NONE | UARTn enters or exits the loopback mode |
AT+FILTER_RESET | Filter Reset |
AT+CHECK_CRC=N | The IM19EE firmware CRC is calculated for checking the firmware, where N is the firmware size |
AT+CORRECT_HOLDER=ENABLE/DISABLE | Turn on or off RTK pole length compensation |
AT+OUTPUT_DISABLE=UARTxn | Disable the output of all messages over the serial port UARTn |
AT+CALIBRATE_MODE2=STEP1/STEP2 | Factory calibration command |
AT+SET_CHECK_LEVEL=LEVELx | Set check level of calibration parameter |
AT+FACTORY_PARA_x=X,Y,Z | Recovery factory calibration parameter |
AT+SET_PPS_EDGE=RISING/FALLING | Set PPS edge, accept falling pps edge by default |
For more information, please reference the IM19 integration manual.
Compatible Software
Below are some compatible software options for configuring the IM19 attitude module and receiving the tilt-compensated position in its proprietary message format.
PyGPSClient
As of v1.5.8, a widget has been added to the PyGPSClient application to configure and utilize the IM19 attitude module.
For additional information, users can refer to the following resources for the PyGPSClient software:
Installation
There are a variety of installation methods detailed in the GitHub repository's README.md file. However, we recommend utilizing the pip installation method.
Depending on how Python is installed on the computer, one of the following commands should allow users to install the software.
-
python3 -m pip install pygpsclient
-
pip install pygpsclient
This installation method requires an internet connection. Additionally, users will also need administrative privileges (or root access sudo) for the installation.
Device Connection
Before users can connect to the IM19 breakout board, they will need to specify the settings of the UART port in PyGPSClient. Once configured, users can select the button and PyGPSClient will automatically attempt to connect to the GNSS module.
- Below, is a list of the default settings for
UARTports of the IM19. These settings should be selected in the configuration menu. - For the
Serial Port, select the port associated with the attached UART interface.
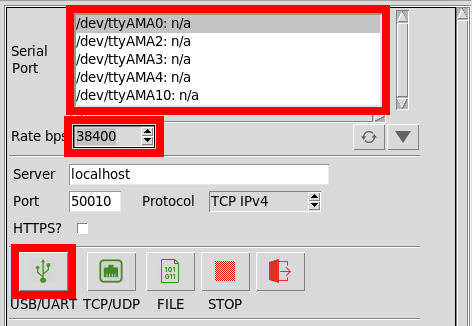
The UART ports of the IM19 attitude module have the following default configuration:
- Baud Rate: 115200bps
- Data Bits: 8
- Parity: No
- Stop Bits: 1
Arduino IDE
Most users may already be familiar with the Arduino IDE and its use. However, for those of you who have never heard the name Arduino before, feel free to check out the Arduino website. To get started with using the Arduino IDE, check out our tutorials below:
- What is an Arduino?
- Installing the Arduino IDE
- Installing an Arduino Library
- Installing Board Definitions in the Arduino IDE
IM19 IMU Arduino Library
The SparkFun IM19 Tilt Sensor Arduino Library can be installed from the library manager in the Arduino IDE by searching for:
SparkFun IM19 IMU Arduino Library

For users who would like to manually download and install the library, the *.zip file can be accessed from the GitHub repository or downloaded by clicking the button below.