Now that we have our library installed, we can get started playing around with our examples for each sensor. For the scope of this tutorial, we will combine the basic examples to output the values to a Serial Monitor. Then we will use the BME280 to compensate for the temperature and relative humidity. From there we will be able to build our own custom code to integrate the sensor into a project.
Example 1: ENS160 and BME280 Combined Examples
Below is the combined example to read ENS160 and BME280. Copy and paste the code below in your Arduino IDE.
/* Ex1_Combined_Basic_Example_ENS160_BME280.inoThis example shows basic data retrieval from the SparkFun Environmental Combo Breakoutfrom the Air Quality Sensor (ENS160) and Atmospheric Sensor (BME280).This example shows how to read sensor readings from the ENS160 (air quality index tVOC, and eCO2)and BME280 (humidity, pressure, and current temperature) over I2C.Modified by:Ho Yun "Bobby" Chan @ SparkFun Electronics August, 2023Basic Example for the ENS160 Originally Written by:Elias Santistevan @ SparkFun Electronics October, 2022Basic Example for the ENS160 Originally Written by:Nathan Seidle @ SparkFun Electronics March 9th, 2018Products:Air Quality Sensor (ENS160) - https://www.sparkfun.com/products/20844Humidity and Temperature Sensor (BME280) - https://www.sparkfun.com/products/13676Repository:https://github.com/sparkfun/SparkFun_Indoor_Air_Quality_Sensor-ENS160_Arduino_LibrarySparkFun code, firmware, and software is released under the MITLicense(http://opensource.org/licenses/MIT).*/#define Serial SerialUSB //Uncomment if you are using a native USB like the Atmega32U4 or SAMD21#include<Wire.h>#include"SparkFun_ENS160.h" // Click here to get the library: http://librarymanager/All#SparkFun_ENS160#include"SparkFunBME280.h" // Click here to get the library: http://librarymanager/All#SparkFun_BME280SparkFun_ENS160myENS;BME280myBME280;intensStatus;voidsetup(){Wire.begin();Serial.begin(115200);if(!myENS.begin()){Serial.println("Did not begin.");while(1);}if(myBME280.beginI2C()==false)//Begin communication over I2C{Serial.println("The sensor did not respond. Please check wiring.");while(1);//Freeze}// Reset the indoor air quality sensor's settings.if(myENS.setOperatingMode(SFE_ENS160_RESET))Serial.println("Ready.");delay(100);// Device needs to be set to idle to apply any settings.// myENS.setOperatingMode(SFE_ENS160_IDLE);// Set to standard operation// Others include SFE_ENS160_DEEP_SLEEP and SFE_ENS160_IDLEmyENS.setOperatingMode(SFE_ENS160_STANDARD);// There are four values here:// 0 - Operating ok: Standard Operation// 1 - Warm-up: occurs for 3 minutes after power-on.// 2 - Initial Start-up: Occurs for the first hour of operation.// and only once in sensor's lifetime.// 3 - No Valid OutputensStatus=myENS.getFlags();Serial.print("Gas Sensor Status Flag: ");Serial.println(ensStatus);}voidloop(){if(myENS.checkDataStatus()){Serial.print("Air Quality Index (1-5) : ");Serial.println(myENS.getAQI());Serial.print("Total Volatile Organic Compounds: ");Serial.print(myENS.getTVOC());Serial.println("ppb");Serial.print("CO2 concentration: ");Serial.print(myENS.getECO2());Serial.println("ppm");Serial.print("Humidity: ");Serial.print(myBME280.readFloatHumidity(),0);Serial.println("RH%");Serial.print("Pressure: ");Serial.print(myBME280.readFloatPressure(),0);Serial.println("Pa");Serial.print("Alt: ");//Serial.print(myBME280.readFloatAltitudeMeters(), 1);//Serial.println("meters");Serial.print(myBME280.readFloatAltitudeFeet(),1);Serial.println("feet");Serial.print("Temp: ");//Serial.print(myBME280.readTempC(), 2);//Serial.println(" degC");Serial.print(myBME280.readTempF(),2);Serial.println(" degF");Serial.println();}delay(200);}
Select your board in the Tools menu (in our case Arduino Uno) and the correct Port it enumerated on and click "Upload". After uploading the code, open the Serial Monitor or terminal emulator of your choice with the baud rate set to 115200.
Note
Note that the ENS160 needs some time to calculate values as stated in the datasheet on page 15 and 16 before the measurements are reasonable. Try moving the ensStatus into the loop to monitor the reliability of the ENS160's output.
Initial Start-Up
Initial Start-Up is the time the ENS160 needs to exhibit reasonable air quality readings after its first ever power-on.
The ENS160 sensor raw resistance signals and sensitivities will change upon first power-on. The change in resistance is greatest in the first 48 hours of operation. Therefore, the ENS160 employs a start-up algorithm, allowing eCO2, TVOC and AQI output signals to be used from first power-on after 1 hour of operation.
Initial Warm-Up
Further to “Initial Start-up” the conditioning or “Warm-up” period is the time required to achieve adequate sensor stability before measuring VOCs after idle periods or power-off. Typically, the ENS160 requires 3 minutes of warm-up until reasonable air quality readings can be expected.
Example 2: Combined Basic Example ENS160/BME280 in CSV Format
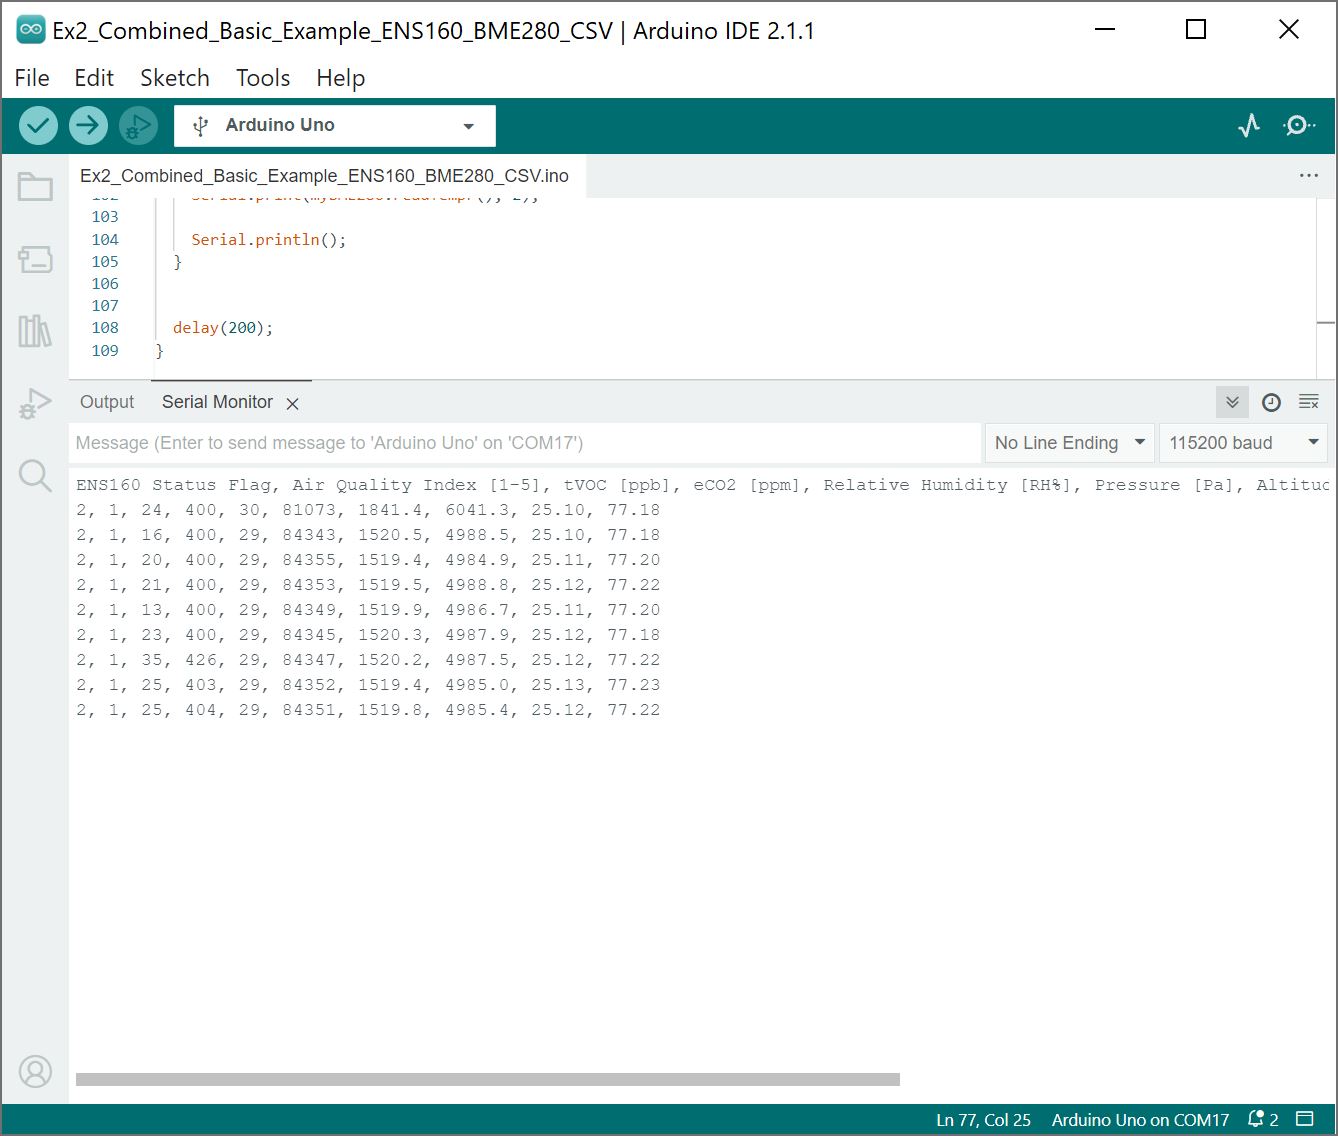
Below is the same combined code but formatted for CSV. Copy and paste the code below in your Arduino IDE.
Example 2: Combined Basic Example ENS160/BME280 in CSV Format
/* Ex2_Combined_Basic_Example_ENS160_BME280_CSV.ino This example shows basic data retrieval from the SparkFun Environmental Combo Breakout from the Air Quality Sensor (ENS160) and Atmospheric Sensor (BME280). This example shows how to read sensor readings from the ENS160 (air quality index tVOC, and eCO2) and BME280 (humidity, pressure, and current temperature) over I2C. The output format is in CSV. Modified by: Ho Yun "Bobby" Chan @ SparkFun Electronics August, 2023 Basic Example for the ENS160 Originally Written by: Elias Santistevan @ SparkFun Electronics October, 2022 Basic Example for the ENS160 Originally Written by: Nathan Seidle @ SparkFun Electronics March 9th, 2018 Products: Air Quality Sensor (ENS160) - https://www.sparkfun.com/products/20844 Humidity and Temperature Sensor (BME280) - https://www.sparkfun.com/products/13676 Repository: https://github.com/sparkfun/SparkFun_Indoor_Air_Quality_Sensor-ENS160_Arduino_Library SparkFun code, firmware, and software is released under the MIT License(http://opensource.org/licenses/MIT).*/#include<Wire.h>#include"SparkFun_ENS160.h" // Click here to get the library: http://librarymanager/All#SparkFun_ENS160#include"SparkFunBME280.h" // Click here to get the library: http://librarymanager/All#SparkFun_BME280SparkFun_ENS160myENS;BME280myBME280;intensStatus;voidsetup(){Wire.begin();Serial.begin(115200);if(!myENS.begin()){Serial.println("Did not begin.");while(1);}if(myBME280.beginI2C()==false)//Begin communication over I2C{Serial.println("The sensor did not respond. Please check wiring.");while(1);//Freeze}// Reset the indoor air quality sensor's settings.if(myENS.setOperatingMode(SFE_ENS160_RESET))//Serial.println("Ready.");delay(100);// Device needs to be set to idle to apply any settings.// myENS.setOperatingMode(SFE_ENS160_IDLE);// Set to standard operation// Others include SFE_ENS160_DEEP_SLEEP and SFE_ENS160_IDLEmyENS.setOperatingMode(SFE_ENS160_STANDARD);// There are four values here:// 0 - Operating ok: Standard Operation// 1 - Warm-up: occurs for 3 minutes after power-on.// 2 - Initial Start-up: Occurs for the first hour of operation.// and only once in sensor's lifetime.// 3 - No Valid OutputensStatus=myENS.getFlags();//Serial.print("Gas Sensor Status Flag: ");//Serial.println(ensStatus);Serial.println(F("ENS160 Status Flag, Air Quality Index [1-5], tVOC [ppb], eCO2 [ppm], Relative Humidity [RH%], Pressure [Pa], Altitude [m], Altitude [ft], Temperature [degC], Temperature [degF]"));}voidloop(){if(myENS.checkDataStatus()){ensStatus=myENS.getFlags();Serial.print(ensStatus);Serial.print(F(", "));Serial.print(myENS.getAQI());Serial.print(F(", "));Serial.print(myENS.getTVOC());Serial.print(F(", "));Serial.print(myENS.getECO2());Serial.print(F(", "));Serial.print(myBME280.readFloatHumidity(),0);Serial.print(F(", "));Serial.print(myBME280.readFloatPressure(),0);Serial.print(F(", "));Serial.print(myBME280.readFloatAltitudeMeters(),1);Serial.print(F(", "));Serial.print(myBME280.readFloatAltitudeFeet(),1);Serial.print(F(", "));Serial.print(myBME280.readTempC(),2);Serial.print(F(", "));Serial.print(myBME280.readTempF(),2);Serial.println();}delay(200);}
Select your board in the Tools menu (in our case Arduino Uno) and the correct Port it enumerated on and click "Upload". After uploading the code, open the Serial Monitor or terminal emulator of your choice with the baud rate set to 115200.
Example 3: BME280 Temperature and Relative Humidity Compensation
Note
This example is actually in the ENS160 Arduino Library! It is listed as example 4 even though in this tutorial we are referring to it as "example 3."
The example code below uses the BME280 for temperature and relative humidity compensation when reading values from the ENS160. Copy and paste the code below in your Arduino IDE.
Example 3: BME280 Temperature and Relative Humidity Compensation
/* example4_BME280_temp_rh_compensation.ino This example shows how to give the ENS160 Temperature and Relative Humidity Data for compensation with the BME280. Note that the values that are given for compensation are not populated in their registers until the Air Quality Sensor is set to "Standard" operation and when data is ready (i.e. the data ready bit is set). Also note that there will be some rounding of the temperature and relative humidity values when they're given to the sensor and again when they're read back. Please note that for compensation values the datasheet specifies that they can be written at any time. Modified by: Ho Yun "Bobby" Chan @ SparkFun Electronics August, 2023 Written by: Elias Santistevan @ SparkFun Electronics October, 2022 Products: Air Quality Sensor (ENS160) - https://www.sparkfun.com/products/20844 Humidity and Temperature Sensor (BME280) - https://www.sparkfun.com/products/13676 Repository: https://github.com/sparkfun/SparkFun_Indoor_Air_Quality_Sensor-ENS160_Arduino_Library SparkFun code, firmware, and software is released under the MIT License(http://opensource.org/licenses/MIT).*/#include<Wire.h>#include"SparkFun_ENS160.h"// Click here to get the library: http://librarymanager/All#SparkFun_ENS160#include"SparkFunBME280.h" // Click here to get the library: http://librarymanager/All#SparkFun_BME280SparkFun_ENS160myENS;BME280myBME280;boolprintedCompensation=false;intensStatus;floatrh;floattempC;voidsetup(){Wire.begin();Serial.begin(115200);if(!myENS.begin()){Serial.println("Air Quality Sensor did not begin.");while(1);}if(myBME280.beginI2C()==false)//Begin communication over I2C{Serial.println("The Environmental did not respond. Please check wiring or I2C Address.");while(1);//Freeze}Serial.println("Example 4 Humidity and Temperature Sensor Compensation - BME280.");rh=myBME280.readFloatHumidity();tempC=myBME280.readTempC();Serial.print("Relative Humidity (%): ");Serial.println(rh);Serial.print("Temperature (Celsius): ");Serial.println(tempC);// Reset the indoor air quality sensor's settings.if(myENS.setOperatingMode(SFE_ENS160_RESET))Serial.println("Ready.");delay(100);// Give values to Air Quality Sensor.myENS.setTempCompensationCelsius(tempC);myENS.setRHCompensationFloat(rh);delay(500);// Set to standard operation// Others include SFE_ENS160_DEEP_SLEEP and SFE_ENS160_IDLEmyENS.setOperatingMode(SFE_ENS160_STANDARD);// There are four values here:// 0 - Operating ok: Standard Opepration// 1 - Warm-up: occurs for 3 minutes after power-on.// 2 - Initial Start-up: Occurs for the first hour of operation.// and only once in sensor's lifetime.// 3 - No Valid OutputensStatus=myENS.getFlags();Serial.print("Gas Sensor Status Flag (0 - Standard, 1 - Warm up, 2 - Initial Start Up): ");Serial.println(ensStatus);}voidloop(){if(myENS.checkDataStatus()){if(printedCompensation==false){Serial.println("---------------------------");Serial.print("Compensation Relative Humidity (%): ");Serial.println(myENS.getRH());Serial.println("---------------------------");Serial.print("Compensation Temperature (Celsius): ");Serial.println(myENS.getTempCelsius());Serial.println("---------------------------");printedCompensation=true;delay(500);}Serial.print("Air Quality Index (1-5) : ");Serial.println(myENS.getAQI());Serial.print("Total Volatile Organic Compounds: ");Serial.print(myENS.getTVOC());Serial.println("ppb");Serial.print("CO2 concentration: ");Serial.print(myENS.getECO2());Serial.println("ppm");Serial.println();}delay(200);}
Select your board in the Tools menu (in our case Arduino Uno) and the correct Port it enumerated on and click "Upload". After uploading the code, open the Serial Monitor or terminal emulator of your choice with the baud rate set to 115200.
More Examples!!!
Make sure to check the Arduino Libraries that you installed on your computer for more examples with the ENS160 and BME280! Remember, the SPI port is not broken out on the Environmental Combo Breakout - ENS160/BME280 so those examples will not apply for this specific board.