Arduino Examples
The SparkFun SCD4X Arduino Library includes several examples to start receiving CO2 concentration, temperature and humidity data from the SCD4X. Let's take a closer look at a few of the examples included with the library.
Example 1 - Basic Readings
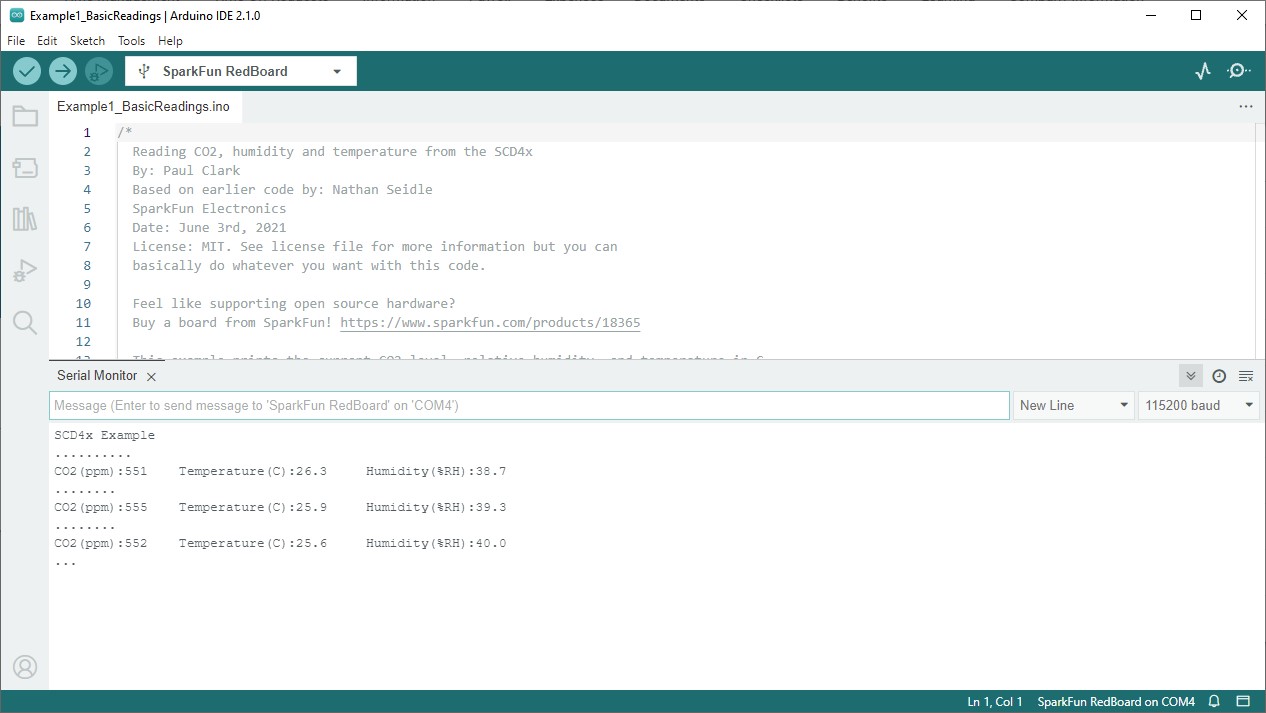
The first example in the library demonstrates how to initialize the SCD4X on the I2C bus to poll data from the sensor using periodic measurements every five seconds. Open the example by navigating to File > Examples > SparkFun SCD4x Arduino Library > Example1_BasicReadings. Alternatively, you can copy the code below into a blank Arduino sketch:
Example 1 Arduino Code
/*
  Reading CO2, humidity and temperature from the SCD4x
  By: Paul Clark
  Based on earlier code by: Nathan Seidle
  SparkFun Electronics
  Date: June 3rd, 2021
  License: MIT. See license file for more information but you can
  basically do whatever you want with this code.

  Feel like supporting open source hardware?
  Buy a board from SparkFun! https://www.sparkfun.com/products/18365

  This example prints the current CO2 level, relative humidity, and temperature in C.

  Hardware Connections:
  Attach RedBoard to computer using a USB cable.
  Connect SCD40/41 to RedBoard using Qwiic cable.
  Open Serial Monitor at 115200 baud.
*/

#include <Wire.h>

#include "SparkFun_SCD4x_Arduino_Library.h" //Click here to get the library: http://librarymanager/All#SparkFun_SCD4x
SCD4x mySensor;

void setup()
{
  Serial.begin(115200);
  Serial.println(F("SCD4x Example"));
  Wire.begin();

  //mySensor.enableDebugging(); // Uncomment this line to get helpful debug messages on Serial

  //.begin will start periodic measurements for us (see the later examples for details on how to override this)
  if (mySensor.begin() == false)
  {
    Serial.println(F("Sensor not detected. Please check wiring. Freezing..."));
    while (1)
      ;
  }

  //The SCD4x has data ready every five seconds
}

void loop()
{
  if (mySensor.readMeasurement()) // readMeasurement will return true when fresh data is available
  {
    Serial.println();

    Serial.print(F("CO2(ppm):"));
    Serial.print(mySensor.getCO2());

    Serial.print(F("\tTemperature(C):"));
    Serial.print(mySensor.getTemperature(), 1);

    Serial.print(F("\tHumidity(%RH):"));
    Serial.print(mySensor.getHumidity(), 1);

    Serial.println();
  }
  else
    Serial.print(F("."));

  delay(500);
}
Select your Board/Port and click the "Upload" button. Once the code finishes uploading, open up a Serial Monitor and check the output. You should see CO2, temperature and humidity data print out every 5 seconds:
Example 2 - Low Power Readings
The second example demonstrates how to configure the SCD4X to disable periodic measurements and enable low-power mode. This sets the SCD4x to take measurements every 30 seconds. Open the example in Arduino or copy the code below into a blank sketch:
Example 2 Arduino Code
/*
  Reading CO2, humidity and temperature from the SCD4x in Low Power mode
  By: Paul Clark
  Based on earlier code by: Nathan Seidle
  SparkFun Electronics
  Date: June 3rd, 2021
  License: MIT. See license file for more information but you can
  basically do whatever you want with this code.

  Feel like supporting open source hardware?
  Buy a board from SparkFun! https://www.sparkfun.com/products/18365

  This example prints the current CO2 level, relative humidity, and temperature in C.

  Hardware Connections:
  Attach RedBoard to computer using a USB cable.
  Connect SCD40/41 to RedBoard using Qwiic cable.
  Open Serial Monitor at 115200 baud.
*/

#include <Wire.h>

#include "SparkFun_SCD4x_Arduino_Library.h" //Click here to get the library: http://librarymanager/All#SparkFun_SCD4x
SCD4x mySensor;

void setup()
{
  Serial.begin(115200);
  Serial.println(F("SCD4x Example"));
  Wire.begin();

  //mySensor.enableDebugging(); // Uncomment this line to get helpful debug messages on Serial

  //.begin will start periodic measurements for us (see the later examples for details on how to override this)
  if (mySensor.begin() == false)
  {
    Serial.println(F("Sensor not detected. Please check wiring. Freezing..."));
    while (1)
      ;
  }

  //By default, the SCD4x has data ready every five seconds.
  //We can enable low power operation and receive a reading every ~30 seconds

  //But first, we need to stop periodic measurements otherwise startLowPowerPeriodicMeasurement will fail
  if (mySensor.stopPeriodicMeasurement() == true)
  {
    Serial.println(F("Periodic measurement is disabled!"));
  }

  //Now we can enable low power periodic measurements
  if (mySensor.startLowPowerPeriodicMeasurement() == true)
  {
    Serial.println(F("Low power mode enabled!"));
  }

  //The SCD4x has data ready every thirty seconds
}

void loop()
{
  if (mySensor.readMeasurement()) // readMeasurement will return true when fresh data is available
  {
    Serial.println();

    Serial.print(F("CO2(ppm):"));
    Serial.print(mySensor.getCO2());

    Serial.print(F("\tTemperature(C):"));
    Serial.print(mySensor.getTemperature(), 1);

    Serial.print(F("\tHumidity(%RH):"));
    Serial.print(mySensor.getHumidity(), 1);

    Serial.println();
  }
  else
    Serial.print(F("."));

  delay(1000);
}
After uploading, open the serial monitor and you should see data print out every second though it should remain static for the 30 seconds between measurements.
Example 6 - Signal Compensation
Example six shows how to input custom compensation values for temperature, altitude and ambient pressure. The code stops periodic measurements while the values are stored. These values are stored in the sensor's RAM by default but can be stored in EEPROM. When stored in RAM, the values reset if reInit is called or on a power cycle. After the settings are stored, the code reinitializes periodic measurements and prints out data for CO2, temperature, and humidity.
Example 6 Arduino Code
/*
  Signal Compensation
  By: Paul Clark
  Based on earlier code by: Nathan Seidle
  SparkFun Electronics
  Date: June 3rd, 2021
  License: MIT. See license file for more information but you can
  basically do whatever you want with this code.

  Feel like supporting open source hardware?
  Buy a board from SparkFun! https://www.sparkfun.com/products/18365

  This example prints the current CO2 level, relative humidity, and temperature in C.

  Hardware Connections:
  Attach RedBoard to computer using a USB cable.
  Connect SCD40/41 to RedBoard using Qwiic cable.
  Open Serial Monitor at 115200 baud.
*/

#include <Wire.h>

#include "SparkFun_SCD4x_Arduino_Library.h" //Click here to get the library: http://librarymanager/All#SparkFun_SCD4x
SCD4x mySensor;

void setup()
{
  Serial.begin(115200);
  Serial.println(F("SCD4x Example"));
  Wire.begin();

  //mySensor.enableDebugging(); // Uncomment this line to get helpful debug messages on Serial

  if (mySensor.begin() == false)
  {
    Serial.println(F("Sensor not detected. Please check wiring. Freezing..."));
    while (1)
      ;
  }

  //We need to stop periodic measurements before we can change the sensor signal compensation settings
  if (mySensor.stopPeriodicMeasurement() == true)
  {
    Serial.println(F("Periodic measurement is disabled!"));
  }

  //Now we can change the sensor settings.
  //There are three signal compensation commands we can use: setTemperatureOffset; setSensorAltitude; and setAmbientPressure

  Serial.print(F("Temperature offset is currently: "));
  Serial.println(mySensor.getTemperatureOffset(), 2); // Print the temperature offset with two decimal places
  mySensor.setTemperatureOffset(5); // Set the temperature offset to 5C
  Serial.print(F("Temperature offset is now: "));
  Serial.println(mySensor.getTemperatureOffset(), 2); // Print the temperature offset with two decimal places

  Serial.print(F("Sensor altitude is currently: "));
  Serial.println(mySensor.getSensorAltitude()); // Print the sensor altitude
  mySensor.setSensorAltitude(1000); // Set the sensor altitude to 1000m
  Serial.print(F("Sensor altitude is now: "));
  Serial.println(mySensor.getSensorAltitude()); // Print the sensor altitude

  //There is no getAmbientPressure command
  bool success = mySensor.setAmbientPressure(98700); // Set the ambient pressure to 98700 Pascals
  if (success)
  {
    Serial.println(F("setAmbientPressure was successful"));
  }

  //The signal compensation settings are stored in RAM by default and will reset if reInit is called
  //or if the power is cycled. To store the settings in EEPROM we can call:
  mySensor.persistSettings(); // Uncomment this line to store the sensor settings in EEPROM

  //Just for giggles, while the periodic measurements are stopped, let's read the sensor serial number
  char serialNumber[13]; // The serial number is 48-bits. We need 12 bytes plus one extra to store it as ASCII Hex
  if (mySensor.getSerialNumber(serialNumber) == true)
  {
    Serial.print(F("The sensor's serial number is: 0x"));
    Serial.println(serialNumber);
  }

  //Finally, we need to restart periodic measurements
  if (mySensor.startPeriodicMeasurement() == true)
  {
    Serial.println(F("Periodic measurements restarted!"));
  }
}

void loop()
{
  if (mySensor.readMeasurement()) // readMeasurement will return true when fresh data is available
  {
    Serial.println();

    Serial.print(F("CO2(ppm):"));
    Serial.print(mySensor.getCO2());

    Serial.print(F("\tTemperature(C):"));
    Serial.print(mySensor.getTemperature(), 1);

    Serial.print(F("\tHumidity(%RH):"));
    Serial.print(mySensor.getHumidity(), 1);

    Serial.println();
  }
  else
    Serial.print(F("."));

  delay(500);
}
Example 8 - SCD41 Single Shot
The eighth example demonstrates how to configure the SCD41 to operate in Single-Shot mode for maximum power efficiency. The code disables periodic measurements and enables single-shot measurements with the measureSingleShot function. The main loop waits for fresh data from the SCD41 and then prints out CO2, temperature, and humidity data whenever it is available.
Example 6 Arduino Code
/*
  SCD41 Low Power Single Shot
  By: Paul Clark
  Based on earlier code by: Nathan Seidle
  SparkFun Electronics
  Date: June 3rd, 2021
  License: MIT. See license file for more information but you can
  basically do whatever you want with this code.

  Feel like supporting open source hardware?
  Buy a board from SparkFun! https://www.sparkfun.com/products/18365

  This example prints the current CO2 level, relative humidity, and temperature in C.

  Hardware Connections:
  Attach RedBoard to computer using a USB cable.
  Connect SCD40/41 to RedBoard using Qwiic cable.
  Open Serial Monitor at 115200 baud.
*/

#include <Wire.h>

#include "SparkFun_SCD4x_Arduino_Library.h" //Click here to get the library: http://librarymanager/All#SparkFun_SCD4x

SCD4x mySensor(SCD4x_SENSOR_SCD41); // Tell the library we have a SCD41 connected

void setup()
{
  Serial.begin(115200);
  Serial.println(F("SCD41 Example"));
  Wire.begin();

  //mySensor.enableDebugging(); // Uncomment this line to get helpful debug messages on Serial

  if (mySensor.begin(false, true, false) == false) // Do not start periodic measurements
  //measBegin_________/     |     |
  //autoCalibrate__________/      |
  //skipStopPeriodicMeasurements_/
  {
    Serial.println(F("Sensor not detected. Please check wiring. Freezing..."));
    while (1)
      ;
  }

  //Let's call measureSingleShot to start the first conversion
  bool success = mySensor.measureSingleShot();
  if (success == false)
  {
    Serial.println(F("measureSingleShot failed. Are you sure you have a SCD41 connected? Freezing..."));
    while (1)
      ;
  }
}

void loop()
{
  while (mySensor.readMeasurement() == false) // readMeasurement will return true when fresh data is available
  {
    Serial.print(F("."));
    delay(500);
  }

  Serial.println();

  Serial.print(F("CO2(ppm):"));
  Serial.print(mySensor.getCO2());

  Serial.print(F("\tTemperature(C):"));
  Serial.print(mySensor.getTemperature(), 1);

  Serial.print(F("\tHumidity(%RH):"));
  Serial.print(mySensor.getHumidity(), 1);

  Serial.println();

  mySensor.measureSingleShotRHTOnly(); // Request just the RH and the Temperature (should take 50ms)

  while (mySensor.readMeasurement() == false) // readMeasurement will return true when fresh data is available
  {
    Serial.print(F("."));
    delay(5);
  }

  Serial.println();

  Serial.print(F("Temperature(C):"));
  Serial.print(mySensor.getTemperature(), 1);

  Serial.print(F("\tHumidity(%RH):"));
  Serial.print(mySensor.getHumidity(), 1);

  Serial.println();

  mySensor.measureSingleShot(); // Request fresh data (should take 5 seconds)
}