Hardware Assembly
Tip
Users unfamiliar with using Arduino shields should refer to the Arduino Shields (v2) tutorial first.
Headers
The pins for the USB Host Shield are broken out to 0.1"-spaced pins on the outer edges of the board. When selecting headers, be sure you are aware of the functionality you need.

Soldering headers to the USB Host Shield.
The Arduino Stackable Header Kit - R3 is a great option as it allows users to stack shields (w/ Uno/R3 footprint); with the pins still accessible through the female headers.

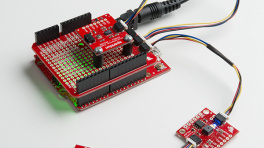
Stacking the USB Host Shield on the SparkFun RedBoard Plus.
Tip
If you have never soldered before or need a quick refresher, check out our How to Solder: Through-Hole Soldering guide.

USB Device
The USB port is utilized for the host/peripheral interface. Users only need to connect a USB device to the USB host shield or connect the shield to a computer with a USB-C cable.

The USB Host Shield with a USB-C adapter and flash drive attached. The shield sits on top of a RedBoard Plus connected to a computer.