Web Interface
Important: Read Before Use!
ESD Sensitivity
The mosaic-X5 module is sensitive to ESD. Use a proper grounding system to make sure that the working surface and the components are at the same electric potential.
ESD Precaution
As recommended by the manufacturer, we highly recommend that users take the necessary precautions to avoid damaging their module.
- The Tri-band GNSS RTK breakout board features ESD protection on the USB-C connector and breakout's I/O:
- USB data lines
- I/O PTH pads
- JST connector's pins
- The mosaic-X5 module features internal ESD protection to the
ANT_1antenna input.
-

iFixit Anti-Static Wrist Strap
TOL-25572
Note
The mosaic-X5 module has numerous capabilities and a multitude of ways to configure and interface with them. Without regurgitating all the information that is documented in Septentrio's user manuals and videos, we have tried to highlight a good majority of the module's aspects.
With that said, please feel free to file an issue if you feel we have missed something that may benefit other users. (Don't forget to provide us with a link to the documentation and what section the information is located.)
USB Driver
If users haven't already installed the RxTools software suite on their Windows PC, they will need to install the USB driver1 necessary to recognize and interact with the mosaic-X5 module through the USB interface.
A Windows USB driver for the mosaic-X5 can be installed through two methods:
- RxTools Software Suite (1)
- mosaic-X5 GNSS Receiver Module (2)
- The driver is installed during the installation process.
- The installation file for the Windows USB driver will be available from the mass-storage device when the board is initially connected to the computer.
Once installed, the driver emulates two virtual serial ports, which can be accessed as standard COM ports to the receiver.
Terminal Emulators
Most terminal emulation programs will not make a distinction between virtual or native COM ports. However, for virtual serial ports, the port settings (i.e. baudrate, etc.) are not relevant and the default configuration be used in the terminal emulation program. However, for the physical/native COM ports will have the following default setting:
- Baudrate: 115200bps
- Data Bits: 8
- Parity: No
- Stop Bits: 1
- Flow Control: None
Having Trouble?
For users who are having trouble installing the USB driver, we have an archived version (v3.0.23) of the installation file. Users can download version 3.0.2 of the driver, by clicking on the button below.
On Linux, the standard Linux CDC-ACM driver is suitable.
Web Interface
With the USB driver installed, the mosaic-X5 module supports Ethernet-over-USB. The default IP address allocated for the Ethernet-over-USB interface is 192.168.3.1. This IP can be entered in any browser to open a connection to the receiver's Web Interface as shown below.
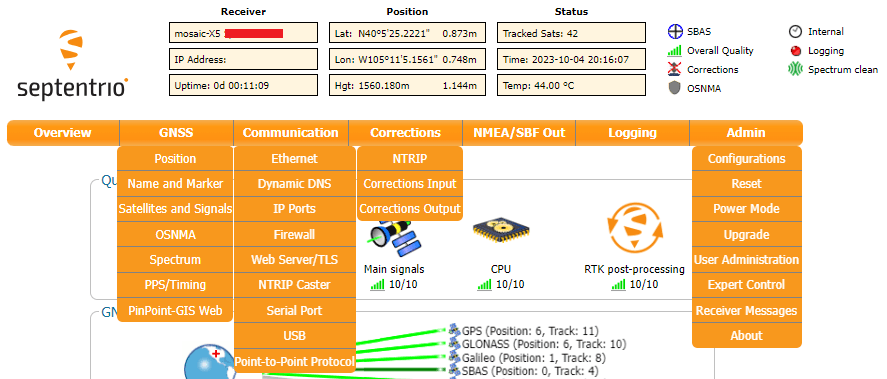
All the drop-down navigation tabs in the web interface.
Info
The default IP address cannot be changed; this feature is only to be used when a single receiver is connected to your computer.
Invalid IP Address (WiFi Only)
One of the documentation pages on Septentrio's website, specifies a default IP address of 192.168.20.1 for the web interface. However, that address is for a WiFi enabled product and cannot be used with this product.
Update the Module's Firmware
Latest Firmware
For the latest firmware released by Septentrio, please visit their product page for the mosaic-X5 module.
-
To check for the latest firmware published by Septentrio, please visit their product page for the mosaic-X5 module. Users can click on the button below, to be redirected to the latest firmware for the mosaic-X5.
-
Currently, at the time that this board was released, the firmware for the mosaic-X5 module was v4.15.02. Users can download version 4.15.0 of the firmware, by clicking on the button below.
GPS Data
Besides logging data with just the LOG button, users can configure/enable the output of data streams through the COM ports and data logging to the SD card through the web interface or RxTools software suite. The videos below illustrate how these features can be operated through the web interface.
Related Video
While this instructional video is for a different product line, the information, for the most part, is still relevant.
RTK Corrections
For users with multiple RTK capable GNSS receivers, users can configure their mosaic-X5 as a rover or base station.
Without having to setup a personal base station, users can receive RTK corrections through the internet from 3rd-party services.
Sharing Internet Access
By default, the mosaic-X5 GNSS receiver is not configured to access the internet through the USB interface. In order to receive or cast RTK corrections to/from a RTK network, such as NTRIP, users will need to enable capability.
- Users will need to use the web interface or RxTool software suite to enable the
Outgoing Internet Access Over USBfrom the Communication > USB drop-down menu of the navigation tabs. - This also requires users to allowing Internet sharing through on their computer as well. The procedure to do so depends on your operating system.
- On a Windows PC, users must enable
Allow other network users to connect through this computer's Internet connection, through the properties option of the network adapter with internet access. - On a Linux computer, users will likely need to configure a network bridge.
- On a Windows PC, users must enable
New IP Address
Once a network bridge is enabled, the receiver will receive its IP address from the computer's DHCP server. Depending on the routing table, the module may no longer be reachable at its default IP address (192.168.3.1).
Enable the L5 Band
The mosaic-X5 is capable of utilizing the L5 frequency band. However, within the GPS network, the L5 service isn't completely operational and is currently marked as unhealthy. Users will need to configure the mosaic-X5 to enable the L5 frequency band.
From the Admin tab, navigate through the drop-down menu to Admin > Expert Control > Control Panel > Navigation > Receiver Operation > Masks. Find the Health Masks box, and configure the Discard unhealthy satellites feature to off for both the Tracking and PVT options.
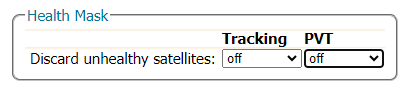
Configuring the Discard unhealthy satellites feature to off.
Note
Make sure to click OK button at the bottom of each page, to save and update the current configuration. Also, the save it to boot option will enable the configuration to persist through power cycles.
From the Navigation tab, navigate through the drop-down menu to Navigation > Advance User Settings > Tracking > Signal Tracking. Find the Signal Tracking box, then enable the GPSL5 option.
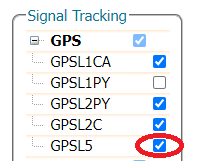
Enabling signal tracking of the L5 frequency band for the GPS constellation.
Click OK
Don't forget to click OK button at the bottom of the page to save and update the current configuration.
Again in the Navigation tab, navigate to Navigation > Advance User Settings > PVT > Signal Usage. Enable the GPSL5 option in both Signals enabled in the PVT and Signals enabled in the navigation data decoder sections.
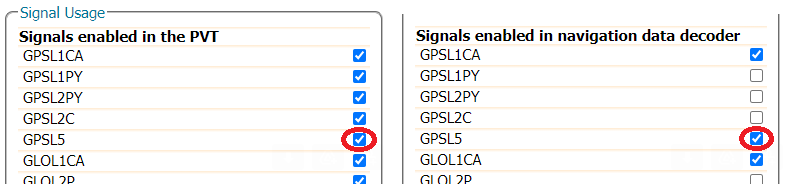
Enabling signal usage of the L5 frequency band for the GPS constellation.
Click OK
Don't forget to click OK button at the bottom of the page to save and update the current configuration.
More Videos
Users can find other instructional videos on Septentrio's YouTube Channel. Feel free to check out their playlists as well:
Other Videos
-
On Linux, the standard Linux CDC-ACM driver is suitable. ↩
-
For the latest firmware published by Septentrio, please visit their product page.
This is firmware version, was archived at the time that this guide was written. Please do not request for the file to be updated; instead visit the product page to download the latest firmware. ↩ -
For the latest USB driver from Septentrio, please install their driver through the RxTools software suite.
This is driver version, was archived at the time that this guide was written. Please do not request for the file to be updated. ↩