The Example2_Interrupts.ino example file can be accessed from the File > Examples > SparkFun STHS34PF80 Arduino Library > Example2_Interrupts drop-down menu. This example builds upon the previous code in Example1_BasicReadings.ino. Instead of constantly streaming the human presence detection values from the STHS34PF80 sensor, the microcontroller waits until an interrupt is triggered before data is retrieved through the I2C interface.
Example2_Interrupts.inoCode Verification
This code was last verified to be functional under the following parameters:
IDE: Arduino 2.2.1
Hardware Platform: SparkFun RedBoard Qwiic
SparkFun Human Presence and Motion Sensor - STHS34PF80 (Qwiic) Version: 1.0
SparkFun Qwiic Mini Human Presence and Motion Sensor - STHS34PF80 Version: 1.0
/****************************************************************************** Example2_Interrupts.ino Read human presence detection value from the STHS34PF80 sensor, print them to terminal using the interrupt flag instead of the typical data ready flag. Prints raw IR presence values (cm^-1). SparkFun STHS34PF80 Arduino Library Madison Chodikov @ SparkFun Electronics Original Creation Date: September 19th, 2023 https://github.com/sparkfun/SparkFun_STHS34PF80_Arduino_Library Development environment specifics: IDE: Arduino 2.2.1 Hardware Platform: SparkFun RedBoard Qwiic SparkFun Human Presence and Motion Sensor - STHS34PF80 (Qwiic) Version: 1.0 SparkFun Qwiic Mini Human Presence and Motion Sensor - STHS34PF80 Version: 1.0 Do you like this library? Help support SparkFun. Buy a board! SparkFun Human Presence and Motion Sensor - STHS34PF80 (Qwiic) https://www.sparkfun.com/products/22494 SparkFun Qwiic Mini Human Presence and Motion Sensor - STHS34PF80 https://www.sparkfun.com/products/23253 Hardware Connections: Use a Qwiic cable to connect from the RedBoard Qwiic to the STHS34PF80 breakout (QWIIC). You can also choose to wire up the connections using the header pins like so: ARDUINO --> STHS34PF80 SDA (A4) --> SDA SCL (A5) --> SCL INT (2) --> INT 3.3V --> 3.3V GND --> GND This program is distributed in the hope that it will be useful, but WITHOUT ANY WARRANTY; without even the implied warranty of MERCHANTABILITY or FITNESS FOR A PARTICULAR PURPOSE. See the GNU General Public License for more details. You should have received a copy of the GNU General Public License along with this program. If not, see <http://www.gnu.org/licenses/>.******************************************************************************/#include"SparkFun_STHS34PF80_Arduino_Library.h"#include<Wire.h>STHS34PF80_I2CmySensor;// Values to fill with presence dataint16_tpresenceVal=0;// Change the pin number to the pin that has been chosen for your setupintintPin=2;// Star the flag as falseboolvolatileinterruptFlag=false;// ISR to set the triggered interruptvoidisr1(){interruptFlag=true;}voidsetup(){Serial.begin(115200);Serial.println("STHS34PF80 Example 2: Interrupts");// Begin I2CWire.begin()// Establish communication with device if(mySensor.begin()==false){Serial.println("Error setting up device - please check wiring.");while(1);}// Set INT pin to be triggered on rising and falling edges of INT pinpinMode(intPin,INPUT);// Attach interrupt to the pin as a digital pin that triggers on a changeattachInterrupt(digitalPinToInterrupt(intPin),isr1,CHANGE);// Route all interrupts from device to interrupt pinmySensor.setTmosRouteInterrupt(STHS34PF80_TMOS_INT_OR);// Enable the presence interrupt source // (see page 17 of application note AN5867 for more information)mySensor.setTmosInterruptOR(STHS34PF80_TMOS_INT_PRESENCE);// Set interrupt value to pulsed on the INT pinmySensor.setInterruptPulsed(0);delay(500);}voidloop(){// If interrupt is triggeredif(interruptFlag==true){interruptFlag=false;sths34pf80_tmos_func_status_tstatus;mySensor.getStatus(&status);Serial.println("Data ready!");// If the flag is high, then read out the informationif(status.pres_flag==1){// Presence Units: cm^-1mySensor.getPresenceValue(&presenceVal);Serial.print("Presence: ");Serial.print(presenceVal);Serial.println("cm^-1");}}}
Hardware Connections
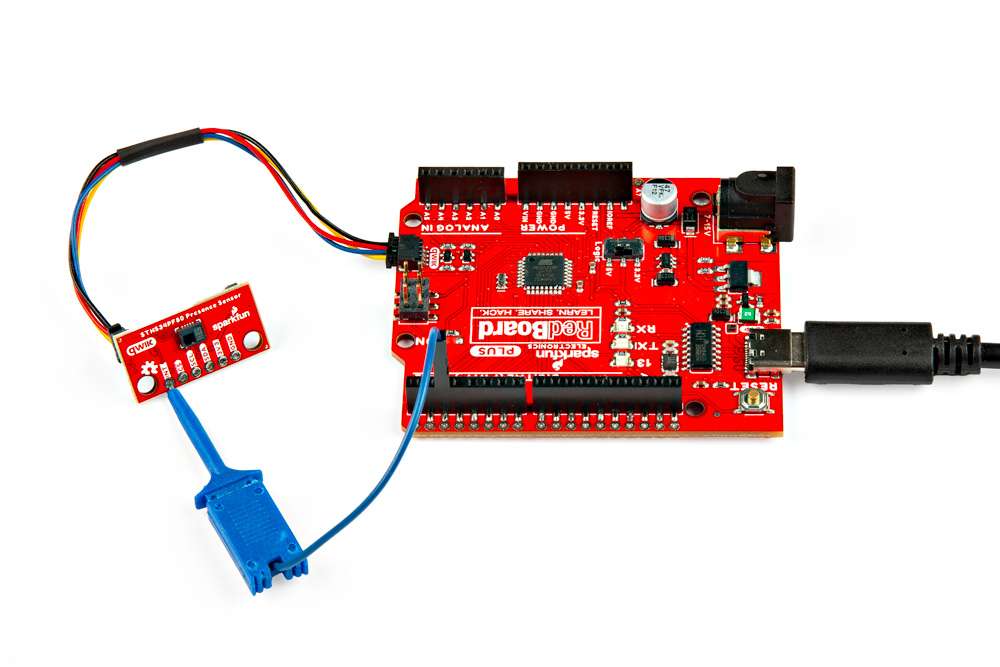
For this example, users simply need to connect their Qwiic Human Presence/Motion Sensor board to their microcontroller, utilizing the I2C interface and interrupt pin. Users can easily connect the I2C interface with the Qwiic connection system on their boards. To connect the interrupt pin, we recommend utilizing an IC-hook for a temporary connection.
*The Qwiic Human Presence/Motion Sensor boards are connected to a RedBoard Plus, with a [Qwiic cable](https://www.sparkfun.com/products/15081) and an [IC-hook](https://www.sparkfun.com/products/9741).*
Pin Connections
For users with a development board without a Qwiic connector, the table below illustrates the required pin connections. Make sure that the logic-level of the sensor is compatible with the development board that is being connected.
Sensor Pin
Microcontroller Pin
RedBoard/Uno
INT
Interrupt Pin
D2
SCL
I2C - Serial Clock
SCL/A5
SDA
I2C - Serial Data
SDA/A4
3V3
Power: 1.7 to 3.6V
3.3V
GND
Ground
GND
Serial Monitor
This example waits until an interrupt is triggered by one of the detection modes before the raw IR presence value (cm-1) is retrieved from the STHS34PF80 sensor. The data is then displayed in the Serial Monitor.
The human presence detection values being streamed from the STHS34PF80 sensor into the Serial Monitor.
Tip
For this example wave different objects in front of the sensor, with varying ranges in and out of the sensor's field of view. Objects that emit black body radiation work the best and should trigger the interrupt.