This example doesn't currently operate properly; we are actively looking into the issue. To track our progress, please refer to this GitHub issue.
Description
The Example4_SPIFunctionality.ino example file can be accessed from the File > Examples > SparkFun STHS34PF80 Arduino Library > Example4_SPIFunctionality drop-down menu. This example operates similarly to the code in Example1_BasicReadings.ino. Instead of retrieving data through the I2C interface, the serial peripheral interface (SPI) is used to access the human presence detection values from the STHS34PF80 sensor.
Example4_SPIFunctionality.inoCode Verification
This code was last verified to be functional under the following parameters:
IDE: Arduino 2.2.1
Hardware Platform: SparkFun RedBoard Qwiic
SparkFun Human Presence and Motion Sensor - STHS34PF80 (Qwiic) Version: 1.0
SparkFun Qwiic Mini Human Presence and Motion Sensor - STHS34PF80 Version: 1.0
/****************************************************************************** Example4_SPIFunctionality.ino Read human presence detection values from the STHS34PF80 sensor, print them to terminal using SPI communication instead of I2C. Prints raw IR presence (cm^-1), if motion was detected, and temperature in degrees C. SparkFun STHS34PF80 Arduino Library Madison Chodikov @ SparkFun Electronics Original Creation Date: September 19th, 2023 https://github.com/sparkfun/SparkFun_STHS34PF80_Arduino_Library Development environment specifics: IDE: Arduino 2.2.1 Hardware Platform: SparkFun RedBoard Qwiic SparkFun Human Presence and Motion Sensor - STHS34PF80 (Qwiic) Version: 1.0 SparkFun Qwiic Mini Human Presence and Motion Sensor - STHS34PF80 Version: 1.0 Do you like this library? Help support SparkFun. Buy a board! SparkFun Human Presence and Motion Sensor - STHS34PF80 (Qwiic) https://www.sparkfun.com/products/22494 SparkFun Qwiic Mini Human Presence and Motion Sensor - STHS34PF80 https://www.sparkfun.com/products/23253 Hardware Connections: Wire the SPI Connections from the RedBoard Qwiic to the STHS34PF80 Breakout with a resistive divider using the header pins like so: ARDUINO --> STHS34PF80 SCK/SCL (13) --> Clock SDI/SDA (12) --> Data in !CS (10) --> Chip Select 3.3V --> 3.3V GND --> GND This program is distributed in the hope that it will be useful, but WITHOUT ANY WARRANTY; without even the implied warranty of MERCHANTABILITY or FITNESS FOR A PARTICULAR PURPOSE. See the GNU General Public License for more details. You should have received a copy of the GNU General Public License along with this program. If not, see <http://www.gnu.org/licenses/>.******************************************************************************/#include"SparkFun_STHS34PF80_Arduino_Library.h"#include<SPI.h>STHS34PF80_SPImySensor;// Presence and Motion variables to fillint16_tpresenceVal=0;floattemperatureVal=0;// Set your chip select pin according to your setupuint8_tchipSelect=10;voidsetup(){Serial.begin(115200);Serial.println("STHS34PF80 Example 4: SPI Functionality");// Configure the chip select pinpinMode(chipSelect,OUTPUT);digitalWrite(chipSelect,HIGH);// Begin SPISPI.begin();// Establish communication with device if(mySensor.begin(chipSelect)==false){Serial.println("Error setting up device - please check wiring.");while(1);}delay(500);}voidloop(){sths34pf80_tmos_drdy_status_tdataReady;mySensor.getDataReady(&dataReady);// Check whether sensor has new data - run through loop if data is readyif(dataReady.drdy==1){sths34pf80_tmos_func_status_tstatus;mySensor.getStatus(&status);// If presence flag is high, then print dataif(status.pres_flag==1){// Presence Units: cm^-1mySensor.getPresenceValue(&presenceVal);Serial.print("Presence: ");Serial.print(presenceVal);Serial.println(" cm^-1");}if(status.mot_flag==1){Serial.println("Motion Detected!");}if(status.tamb_shock_flag==1){mySensor.getTemperatureData(&temperatureVal);Serial.print("Temperature: ");Serial.print(temperatureVal);Serial.println(" °C");}}}
Hardware Connections
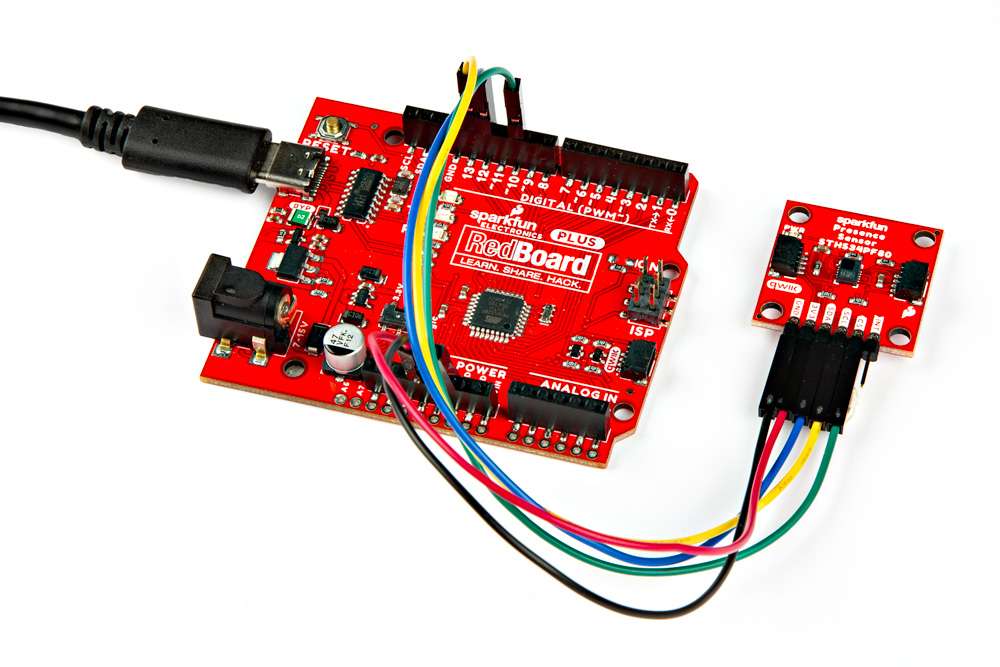
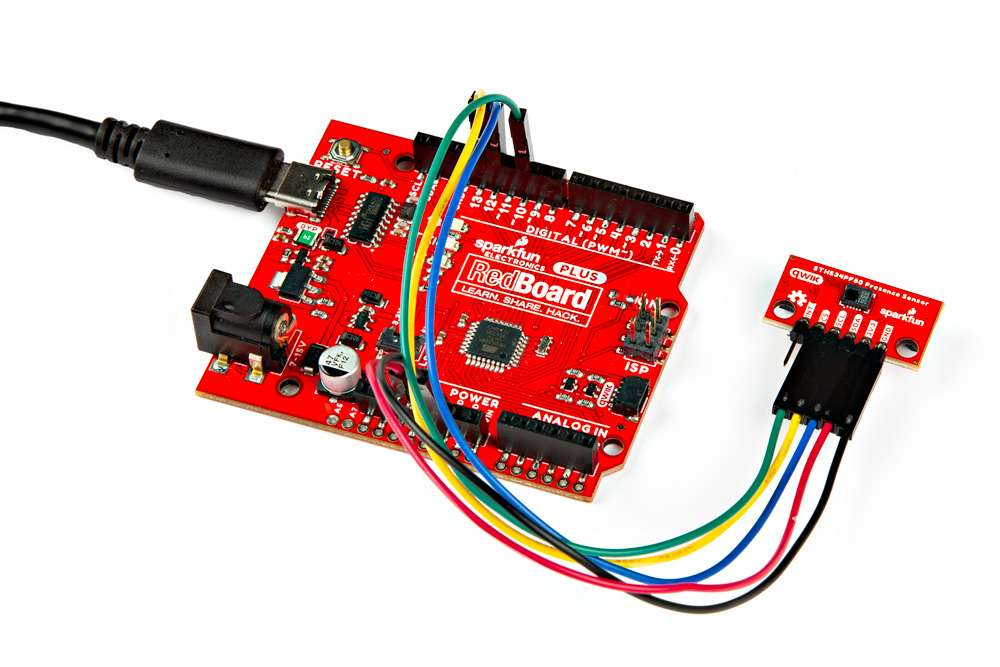
For this example, users will need to modify the CS jumper to enable the SPI communication. In the setups illustrated below, right-angle headers were soldered to the boards and connected with M/F jumper wires to the microcontroller. However, users should select a connection method that suits their needs.
*The Qwiic Human Presence/Motion Sensor boards with [headers](https://www.sparkfun.com/products/553) soldered to them and connected to a RedBoard Plus with [jumper wires](https://www.sparkfun.com/products/9140).*
Pin Connections
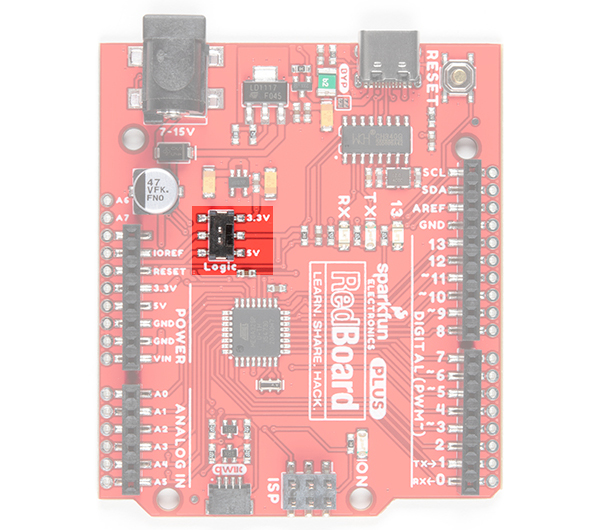
Below are the pin connections for SPI communication with the sensor. Users should be aware of the logic-levels of their microcontroller; with the RedBoard Plus, users only need to flip a switch to configure all the board's pins to 3.3V-logic.
Sensor Pin
Microcontroller Pin
RedBoard Plus
CS
SPI - Chip Select Pin
10
SCL
SPI - Serial Peripheral Clock
13
SDA
SPI - Serial Data In/Out
12
3V3
Power: 1.7 to 3.6V
3.3V
GND
Ground
GND
The logic-level switch on the RedBoard Plus.
Note
Users will need to initially pull the CS pin low, to enable the SPI communication on the Qwiic Human Presence/Motion Sensor boards.