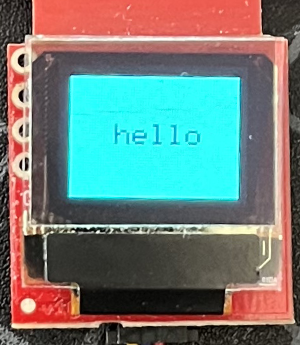
Example 1 - Hello
A simple example to show the basic setup and use of the SparkFun Qwiic OLED Library.
Key Demo Features
- Declaring a Qwiic OLED device object.
- Initializing the Qwiic OLED device
- Drawing a simple graphic - a filled rectangle and a text string
- Using the current font to center text on the screen.
- Displaying the graphics on the screen
Setup
After installing this library in your local Arduino environment, begin with a standard Arduino sketch, and include the header file for this library.
The next step is to declare the object for the SparkFun Qwiic OLED device used. Like most Arduino sketches, this is done at a global scope (after the include file declaration), not within the setup() or loop() functions.
The user selects from one of the following classes:
| Class | Qwiic OLED Device |
|---|---|
QwiicMicroOLED
|
SparkFun Qwiic Micro OLED |
QwiicTransparentOLED
|
SparkFun Transparent Graphical OLED |
QwiicNarrowOLED
|
SparkFun Qwiic OLED Display (128x32) |
Qwiic1in3OLED
|
SparkFun Qwiic OLED 1.3" Display (128x32) |
The example code supports all of the SparkFun Qwiic OLED boards. By default, the Qwiic Micro OLED is selected. To select a different board being used, add a single line comment (i.e. //) in front of "QwiicMicroOLED myOLED;" and uncomment the device being used for the demo board.
QwiicMicroOLED myOLED;
//QwiicTransparentOLED myOLED;
//QwiicNarrowOLED myOLED;
//Qwiic1in3OLED myOLED;
Note
As of version 1.0.2+, users will need to use the class as explained above instead of using a #define.
Initialization
In the setup() function of this sketch, like all of the SparkFun Qwiic Arduino libraries, the device is initialized by calling the begin() method. This method returns a value of true on success, or false on failure.
void setup()
{

    delay(500);   //Give display time to power on

    // Serial on!
    Serial.begin(115200);

    Serial.println("\n\r-----------------------------------");

    Serial.print("Running Example 01 on: ");
    Serial.println(String(deviceName));

    // Initalize the OLED device and related graphics system
    if(!myOLED.begin()){

        Serial.println(" - Device Begin Failed");
        while(1);
    }

    Serial.println("- Begin Success");

   // Do a simple test - fill a rectangle on the screen and then print hello!...

}
Drawing Graphics
Once the device is enabled, the rest of the setup() function is devoted to drawing a simple graphic on the target device.
Filled Rectangle
First, draw a filled rectangle on the screen - leave a 4 pixel boarder at the end of the screen. Note that the getWidth() and getHeight() method are used to get the devices screen size.
    // Fill a rectangle on the screen that has a 4 pixel board
    myOLED.rectangleFill(4, 4, myOLED.getWidth() - 8, myOLED.getHeight() - 8);
Centered Text
The next part of our graphic is a message centered in the drawn rectangle. To do the centering, the current font is accessed from the device, and the size of a character in the font is used to calculate the text position on the screen. Once the position is determined, the message is drawn on the display in black (0 for a color value).
    String hello = "hello"; // our message

    // Center our message on the screen. Get the screen size of the "hello" string,
    // calling the getStringWidth() and getStringHeight() methods on the oled

    // starting x position - screen width minus string width  / 2
    int x0 = (myOLED.getWidth() - myOLED.getStringWidth(hello)) / 2;

    // starting y position - screen height minus string height / 2
    int y0 = (myOLED.getHeight() - myOLED.getStringHeight(hello)) / 2;

    // Draw the text - color of black (0)
    myOLED.text(x0, y0, hello, 0);
Displaying the Graphics
The last step is sending the graphics to the device. This is accomplished by calling the display() method.
What You Should See
And that's it! Select the board and COM port for your development board. Then upload the code! The graphic should display on the OLED device.
