Accuracy Verification
Surveyor: ![]() / Express:
/ Express: ![]() / Express Plus:
/ Express Plus: ![]() / Facet:
/ Facet: ![]() / Facet L-Band:
/ Facet L-Band: ![]() / Reference Station:
/ Reference Station: ![]()
Facet in the field
You’ve got an incredibly powerful GNSS receiver in your hands. How do you verify that you can get really accurate location readings? It's a bit of work but it's a lot of fun and you'll learn a tremendous amount about surveying along the way.
This is, admittedly, a very US-centric tutorial. We hope that it will provide some of the tools and basic guidance to be replicated in other countries. If you have additional sources for GPS/GNSS surveyed monuments in your own country, consider adding them to this document!
This is a replication and confirmation of the procedure done by RTKLibExplorer in 2018. We modified it to demonstrate a similar process but using u-blox hardware and with a few updates.
The process goes like this:
- Find a local monument
- Convert the coordinates
- Take measurements
- Calculate differences
Get Used to RTK
RTK Fix Mode
Before we can consider doing anything in the field, we need to get really comfortable using the RTK product. Verify you can get your device into RTK Fix mode. This includes setting up a permanent base and/or using a service like Skylark to provide the correction data to the RTK product. Before planning a trip to the field get used to using the RTK product in Rover mode with NTRIP corrections being passed over Bluetooth to your device.
Locate GPS Monument
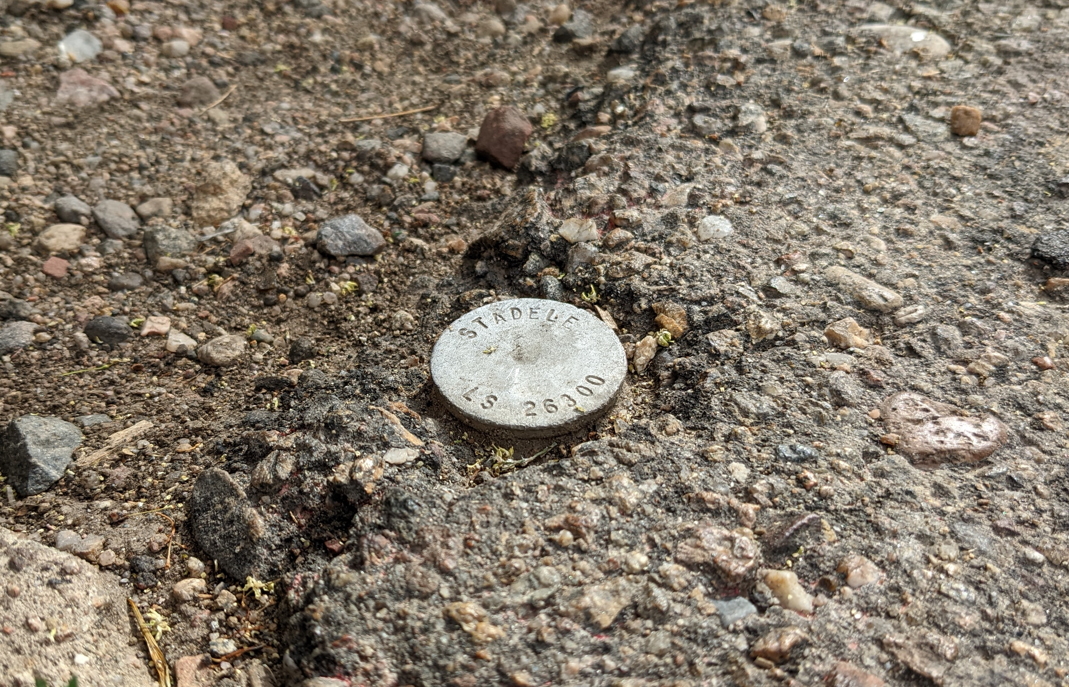
A common metal surveyor's mark
Locate a GPS monument. These are the little metal caps, placed by surveyors, embedded into the sidewalk and roads around populated areas. While monuments are fairly common, we need a monument whose location is precisely known.
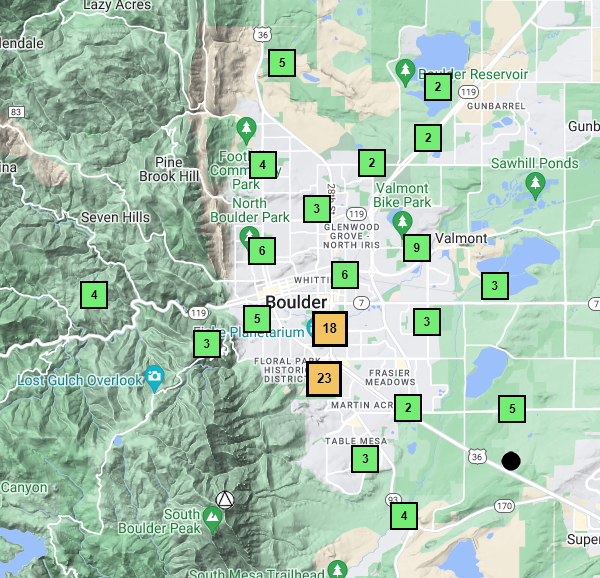
Boulder has a large number of monuments
Thankfully, in the USA the National Geodetic Survey has an incredible database of public monuments. Enter your location into the NGS Data Explorer to find the nearest monument.
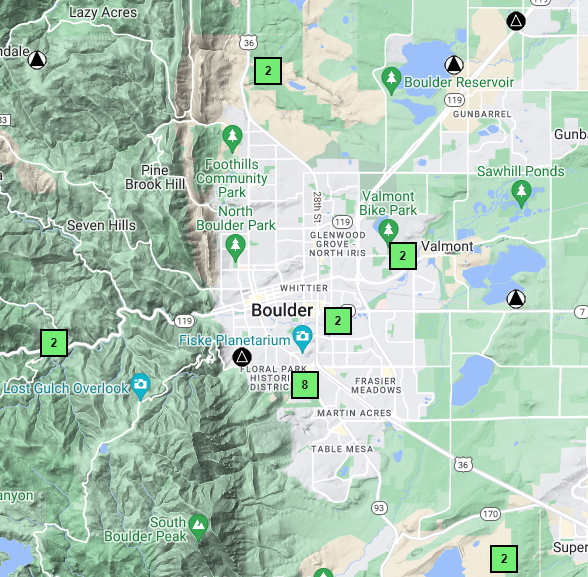
Boulder's GPS monuments
While the Data Explorer will show many marks, turn off all but the GPS marks. These were surveyed with extreme precision and have published coordinates.
Convert Monument Location
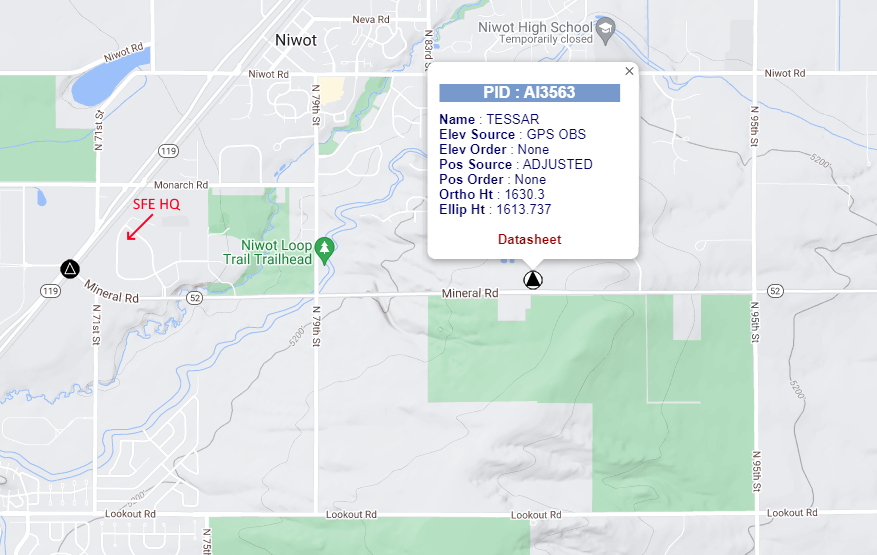
Monument near SparkFun
Find a GPS monument that is easiest for you to get to, click on it, and open the datasheet. You'll see a large amount of text and data for that specific location.
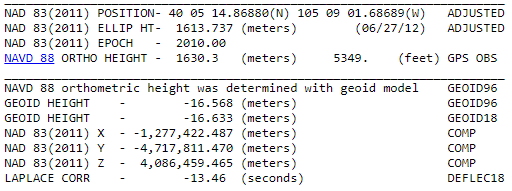
Position in both NAD83 and ECEF
My respect for the surveying industry grows daily, but that doesn't mean they are free from competing and confusing standards. What you need to know is that the SparkFun RTK product line outputs coordinates in the WGS84 coordinate system by default and can output ECEF as well. Most of the coordinates by the NGS are NAD83 which has about a 1.5-meter difference from the WGS84 coordinate system. No big deal for general mapping but it'll throw a wrench in your testing if you're not careful.
The SparkFun example monument is at:
- Latitude: 40 05 14.86880 (NAD83 in 2012)
- Longitude: -105 09 01.68689 (NAD83 in 2012)
- Elliptical Height: 1613.737 meters (NAD83 in 2012)
Convert NAD83 to Today
So we know the NAD83 Lat/Long of our monument, right? Not quite.
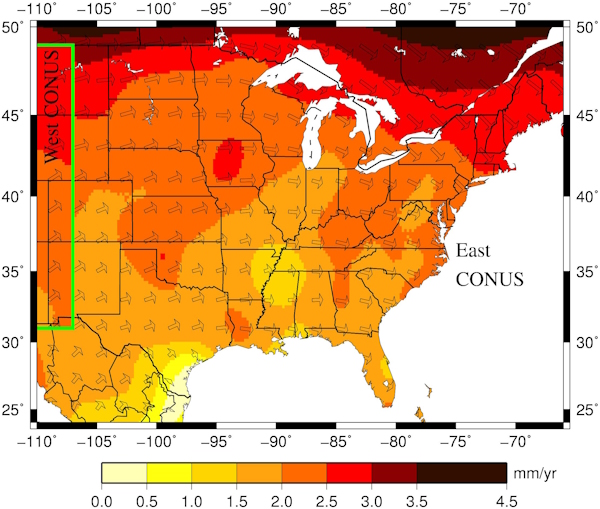
Example plate movement map
The earth is not static and the tectonic plates have this annoying habit of moving. Note that the coordinates from our datasheet are from 6/27/2012. Ten years of movement can affect millimeter measurements.
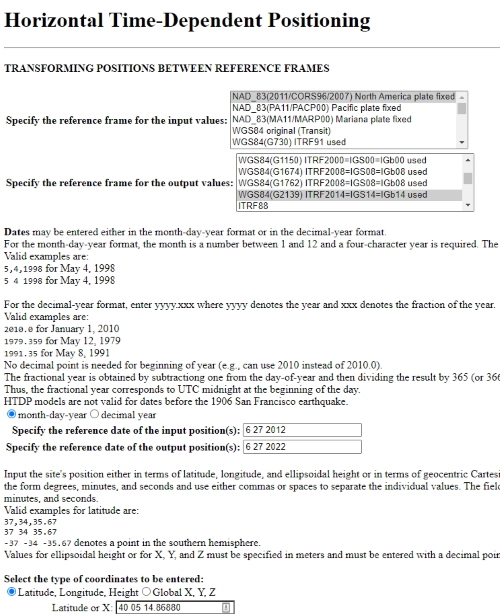
Plate tectonic time machine
Thankfully the NGS has a tool called Horizontal Time-Dependent Positioning. This allows both the conversion between coordinate systems and adjusting a given location to a given start and end time. Use the tool to convert the NAD83 coordinates of your monument from the time they were taken (June 27, 2012, in our example) to WGS84(G2139) coordinates on today's date. If you convert the location for your monument on a Tuesday and visit it 5 days later, the coordinates should still be perfectly fine. This tool is needed both for the coordinate change (NAD83 to WGS84) and for long (months or years) periods between when the monument was surveyed.
Monument converted to WGS84 corrected to 2022
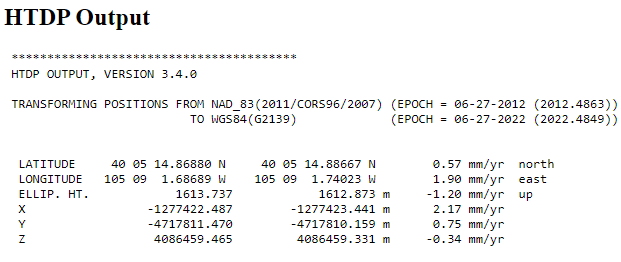
Once we enter all the pertinent data, we receive a nice output showing us our modern-day WGS84 coordinates! Also, note the X/Y/Z ECEF coordinates.
The SparkFun example monument is at:
- Latitude: 40 05 14.88667 (WGS84 in 2022)
- Longitude: -105 09 01.74023 (WGS84 in 2022)
- Elliptical Height: 1612.873 meters (WGS84 in 2022)
And in ECEF (this will be handy in a minute):
- X: -1277423.441 m (ECEF in 2022)
- Y: -4717810.159 m (ECEF in 2022)
- Z: 4086459.331 m (ECEF in 2022)
Convert from HH:MM:SS to Decimal
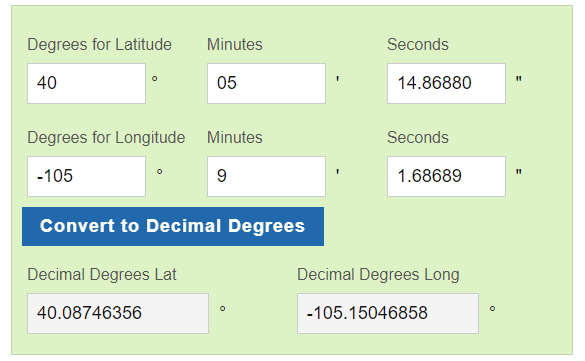
Conversion to Decimal
The NGS coordinates are in the hour/minute/second format (ie, 40 05 14.86880). We need decimal format when we're in the field viewing locations in SW Maps. We recommend the LatLong.net converter, but there are many options. Make sure the tools, converters, and calculators you use maintain 8 decimal places.
The SparkFun example monument is at:
- Latitude: 40.08746852 (WGS84 in 2022)
- Longitude: -105.15048340 (WGS84 in 2022)
- Elliptical Height: 1613.737 meters (WGS84 in 2022)
These are the coordinates we hope to see using SW Maps once we get out into the field. Write down your monument coordinates so that you have some idea of how close your unit is to the ideal in real-time.
Field Trip!
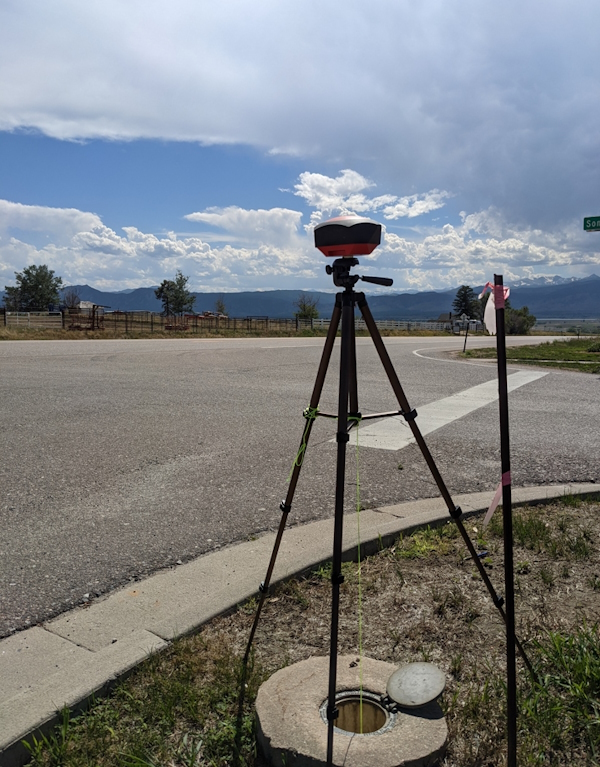
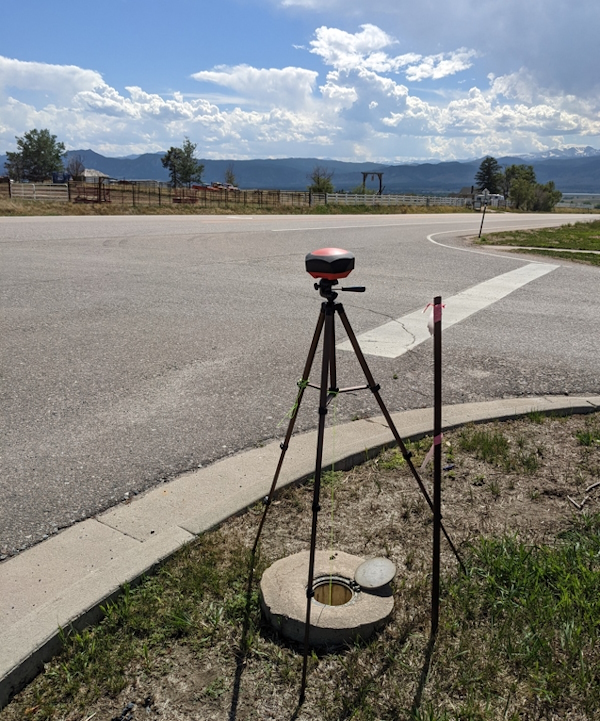
Cheap tripod above the monument
Not a bad view!
You will need to decide how cheap you want your setup to be. I went too cheap; my tripod doesn’t have a hook on the bottom so the string with a bolt (I didn’t even have a plumb bob) to center above the marker was not central to the Facet. The height measurement from the mark to the ARP (bottom of the Facet) was done with a tape measure, in other words, not very accurate. But it works!
Find the monument and locate your Facet (or RTK Surveyor, Express, Express Plus, Facet L-Band, etc) over the monument. Using a tape measure or other tool, measure the distance from the top of the monument to the bottom of the Facet. In this example, it was 45 ¾” or 1162mm. Obviously, millimeters matter here but don't let 'perfection' be the enemy of 'done'.
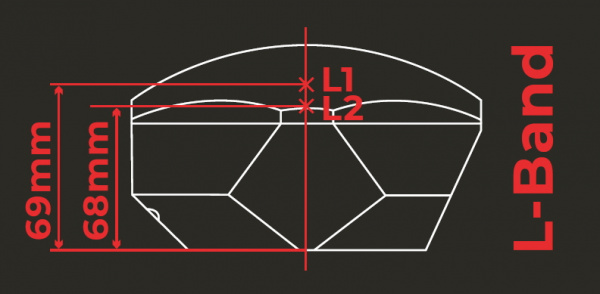
L-Band Facet ARP
Locate the ARP of your given RTK product (53mm for units using the TOP106 Antenna, 61mm for Facet, 69mm for Facet L-Band). Add your ARP to the height above the monument you measured previously. In this example 1416 + 69 = 1.485m. Enter that total height into SW Maps as the ‘Instrument Height’. This will allow the software to subtract the antenna location height from the current 3D location to gain the location of the point where the plumb bob (or bolt) below your apparatus is located.
With your instrument height determined, connect to the RTK product, begin sending RTCM corrections (either over NTRIP or radio link) and enter RTK Fix.
Record Readings
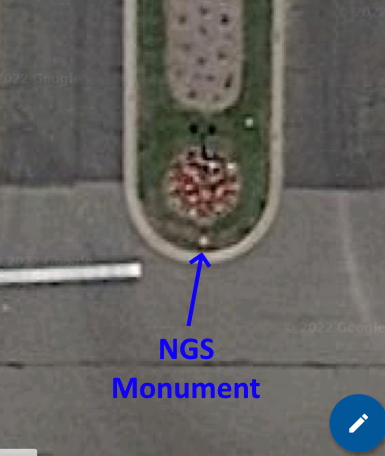
SW Maps screenshot of monument location
We can see the approximate location of the monument in the above location.
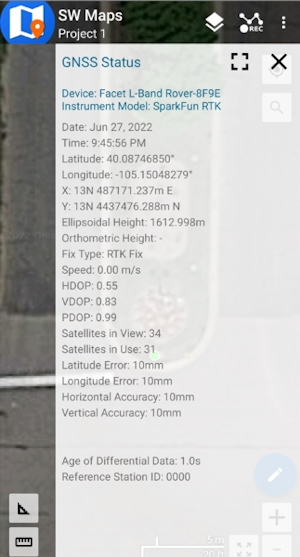
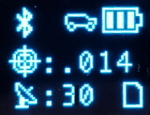
Screenshot of a point in time
Note the 8 decimal places on the Lat/Long.
Screenshots are an easy way to record lat/long/alt but SW Maps (and other GIS software) allows the averaging of a position. Choose your own adventure. For our example, we took screenshots/snapshots of the location. Some surveyors hold a position for multiple minutes to get a point; we can do the same in under a second.

Comparison of three RTK correction sources
Off the shelf, we regularly see 300 down to 150mm horizontal positional accuracy using any RTK product with a good L1/L2 antenna. This is shown in the picture above as the circle with 'No Corrections'.
With corrections turned on, the benefit of an RTK fix is obvious. The two surveyed points overlap each other so closely they are nearly indistinguishable. The SparkFun base station is documented here and has a location accuracy of approximately 8.4mm. Using a base station is more accurate (as we will see) but L-Band corrections will also get you incredibly similar accuracy with a lot less hassle.
Why doesn’t it match the image?
![]()
Actual location vs image
Your location bubble may not fall directly over the pixels representing the monument. Why? Imagine you are a satellite 50 miles above the earth’s surface. Now take a photo that is many megapixels. Now align all those pixels within a few millimeters of reality. Google maps (and all terrestrial imagery as an industry) does an incredible job of aligning the surface imagery but it is not perfect, and it is certainly not millimeter accurate. Do not assume the google maps image is where your monument actually exists.
Spreadsheet Party
We’ve established the monument’s location, we’ve captured the location of the RTK Facet, and they are different, but by how much? Calculating the difference between Lat/Long coordinates is not trivial. We’ve found converting to the ECEF coordinate system is the easiest way to calculate the difference between GPS coordinates.
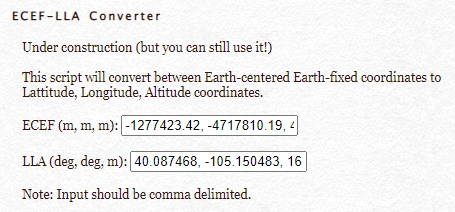
Convert LLA to ECEF
Enter your lat, long, and altitude coordinates into an LLA to ECEF converter. We found the Sysense calculator to work very well. How do we know it’s accurate? Take the original coordinates from the NGS Datasheet, and use the calculator to convert them to ECEF. They are identical.
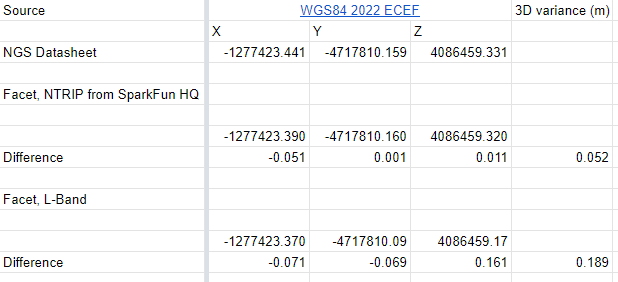
ECEF difference between monument and readings
Feel free to look at and make a copy of the SparkFun example spreadsheet. ECEF is a wonderfully simplistic frame of reference; the comparison between two points is simply X/Y/Z in meters. We can use the Pythagorean theorem to calculate the 3D variance. In our example, it is 52mm using corrections from a fixed base, and 189mm for an L-Band corrected base.
52mm off a professional mark is a clear indicator we are very close to the limit of our equipment. The sheer amount of geoscience, coordinate math, and relativistic physics that very smart people have contributed to enable any part of this experiment is awe-inspiring. It gave me great satisfaction and reassurance that our base at SparkFun HQ is set up well, and that, in the hands of a professional, the RTK product line is quite capable of providing very accurate readings.
How do I get 14mm?!
- Use the best equipment. Our mechanical setup was rickety and cheap. Use a surveyor’s bipod setup, with a bubble level, and a prism pole to accurately level the RTK receiver and measure the distance to the monument.
- Use an antenna that is NGS calibrated to obtain accurate ARPs. The SparkFun TOP106 antenna has been calibrated and we are in the process of calibrating the RTK Facet and RTK Facet L-Band.
- Use an accurate base. A temporary or ‘survey-in’ base will not be accurate. The base needs 24 hours of logging with a PPP analysis.
- Be within 10km of your base. A baseline that is more than 10km will introduce inaccuracies to the RTK fix readings.
- Correction services are not as accurate as a fixed base. While services such as Skylark and PointPerfect are convenient, they use models to estimate the overall isotropic disturbance. A local, fixed base will outperform a correction service.
- Take an average of points. All the points taken in this example were single snapshots. Average a few seconds' worth of readings.
This was a lot of fun and a good excuse to get outdoors. We hope you enjoy finding some new points in your world.