Base Menu
Surveyor: ![]() / Express:
/ Express: ![]() / Express Plus:
/ Express Plus: ![]() / Facet:
/ Facet: ![]() / Facet L-Band:
/ Facet L-Band: ![]() / Reference Station:
/ Reference Station: ![]()
In addition to providing accurate local location fixes, the SparkFun RTK devices can also serve as a correction source, also called a Base. The Base doesn't move and 'knows' where it is so it can calculate the discrepancies between the signals it is receiving and what it should be receiving. Said differently, the 'Base' is told where it is, and that it's not moving. If the GPS signals say otherwise, the Base knows there was a disturbance in the Force ionosphere. These differences are the correction values passed to the Rover so that the Rover can have millimeter-level accuracy.
There are two types of bases: Surveyed and Fixed. A surveyed base is often a temporary base set up in the field. Called a 'Survey-In', this is less accurate but requires only 60 seconds to complete. The 'Fixed' base is much more accurate but the precise location at which the antenna is located must be known. A fixed base is often a structure with an antenna bolted to the side. Raw satellite signals are gathered for a few hours and then processed using Precision Point Position. We have a variety of tutorials that go into depth on these subjects but all you need to know is that the RTK Facet supports both Survey-In and Fixed Base techniques.
Note: The RTK Express Plus does not support Base mode. The Express Press contains an internal IMU and additional algorithms to support high-precision location fixes using dead reckoning.
Note: The RTK Facet L-Band is designed to use corrections provided via u-blox's PointPerfect system therefore, a Base/Rover setup is not needed. However, if the service is not available the RTK Facet L-Band can still be used in a traditional Base/Rover setup. Here we’ll describe how to assemble a Rover and Base.
Please see the following tutorials for more information:
 |
 |
 |
 |
| What is GPS RTK? | Getting Started with u-center for u-blox | Setting up a Rover Base RTK System | How to build a DIY GNSS reference station |
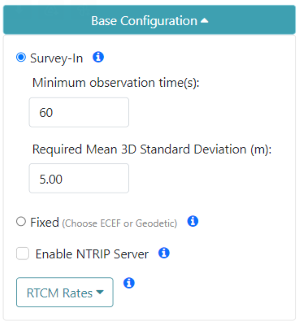
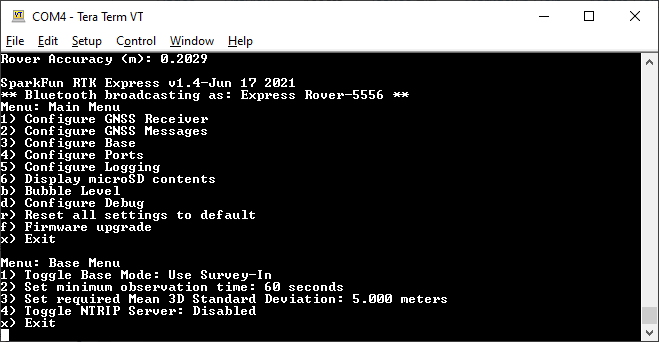
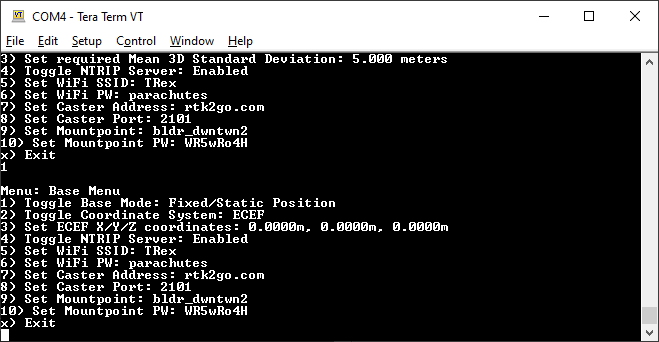
The Base Menu allows the user to select between Survey-In or Fixed Base setups.
Controlling the type of Base from WiFi AP Config
Base Menu Options
Mode
In Survey-In mode, the minimum observation time and Mean 3D Standard Deviation can be set. The defaults are 60 seconds and 5 meters as directed by u-blox. The device will wait for the position accuracy to be better than 1 meter before a Survey-In is started. Don't be fooled; setting the observation time to 4 hours or an initial positional accuracy of 0.3m is not going to significantly improve the accuracy of the survey - use PPP instead.
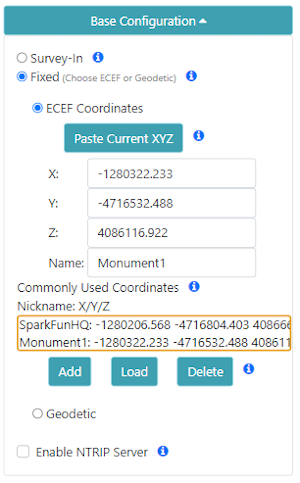
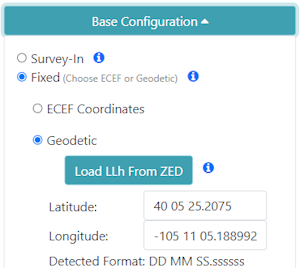
Fixed base coordinate input
In Fixed mode, the coordinates of the antenna need to be set. These can be entered in ECEF or Geographic coordinates. Whenever a user enters Base mode by pressing the SETUP button the GNSS receiver will immediately go into Base mode with these coordinates and immediately begin outputting RTCM correction data.
Note: The 'Paste Current XYZ' button will copy the current base coordinates and paste them into the X/Y/Z boxes. This shortcut allows the user to skip writing down coordinates just to re-enter them. However, taking a snap-shot of the unit's position in time is a very inaccurate way to assign the unit's base position.
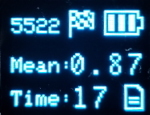
RTK Facet in Survey-In Mode
Once the device has been configured, pressing the Setup button will change the device to Base mode. If the device is configured for Survey-In base mode, a flag icon will be shown and the survey will begin. The mean standard deviation will be shown as well as the time elapsed. For most Survey-In setups, the survey will complete when both 60 seconds have elapsed and a mean of 5m or less is obtained.
RTK Facet in Fixed Transmit Mode
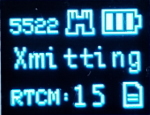
Once the survey-in is complete the device enters RTCM Transmit mode. The number of RTCM transmissions is displayed. By default, this is one per second. During this phase, the ZED-F9P is outputting the RTCM corrections out of the RADIO port. Attaching an external serial radio to this port will allow the Base to send corrections to any Rover.
The Fixed Base mode is similar but uses a structure icon (shown above) to indicate a fixed base.
NTRIP Server
NTRIP is where the real fun begins. The Base needs a method for getting the correction data to the Rover. This can be done using radios but that's limited to a few kilometers at best. If you've got WiFi reception, use the internet!
Enabling NTRIP will present a handful of new options seen below:
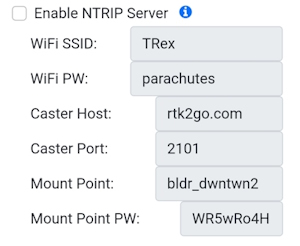
Configuring NTRIP Server settings via WiFi Config AP
Settings for the NTRIP Server
This is a powerful feature of the RTK line of products. The RTK device can be configured to transmit its RTCM directly over WiFi to the user's mount point. This eliminates the need for a radio link.
Once the NTRIP server is enabled you will need a handful of credentials:
- Local WiFi SSID and password
- A casting service such as RTK2Go or Emlid (the port is almost always 2101)
- A mount point and password
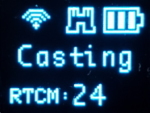
RTK Facet in Transmit Mode with NTRIP Enabled

NTRIP Server Connected!
If the NTRIP server is enabled the device will first attempt to connect over WiFi. The WiFi icon will blink until a WiFi connection is obtained. If the WiFi icon continually blinks be sure to check your SSID and PW for the local WiFi.
Once WiFi connects the device will attempt to connect to the NTRIP mount point. Once successful the display will show 'Casting' along with a solid WiFi icon. The number of successful RTCM transmissions will increase every second.
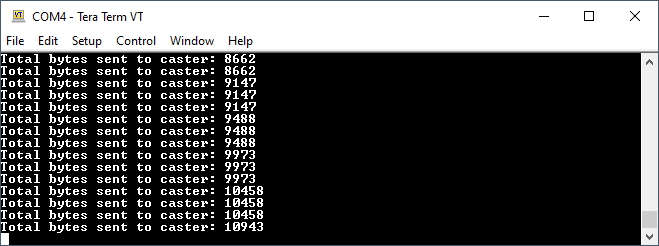
Every second a few hundred bytes, up to ~2k, will be transmitted to your mount point.
Note: During NTRIP transmission WiFi is turned on and Bluetooth is turned off. You should not need to know the location information of the base so Bluetooth should not be needed. If necessary, USB can be connected to view detailed location information using the System Report command.
Commonly Use Coordinates
A list of common coordinates
For users who return to the same base position or monument, the coordinates can be saved to a 'Commonly Used Coordinates' list. A nickname and the X/Y/Z positions are saved to the list. Any record on the list can be loaded from the list into the X/Y/Z fields allowing quick switching without the need to hand record or re-enter coordinates from day-to-day repositioning of the base.
RTCM Message Rates
When the device is in Base mode, the fix rate is set to 1Hz. This will override any Rover setting.

Additionally, RTCM messages are generated at a rate of 1Hz. If lower RTCM rates are desired the RTCM Rates menu can be used to modify the rates of any supported RTCM message. This can be helpful when using longer-range radios that have lower bandwidth.
Supported Lat/Long Coordinate Formats
When entering coordinates for a fixed Base in Geodetic format, the following formats are supported:
- DD.ddddddddd (ie -105.184774720, 40.090335429)
- DDMM.mmmmmmm (ie -10511.0864832)
- DD MM.mmmmmmm (ie 40 05.42013)
- DD-MM.mmmmmmm (40-05.42013)
- DDMMSS.ssssss (-1051105.188992)
- DD MM SS.ssssss (-105 11 05.188992)
- DD-MM-SS.ssssss (40-05-25.2075)
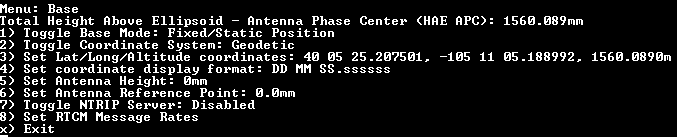
These coordinate formats are automatically detected and converted as needed. The coordinates are displayed in the format they are entered. If a different format is desired, the coordinate display format can be changed via the serial Base menu.
For more information about coordinate formats, check out this online converter.
Assisted Base
An Assisted Base is where a temporary base is set up to Survey-In its location but is simultaneously provided RTCM corrections so that its Survey-In is done with very precise readings. An assisted base running a Survey-In removes much of the relative inaccuracies from a Rover-Base system. We've found an Assisted Base varies as little as 50mm RMS between intra-day tests, with accuracy within 65mm of a PPP of the same location, same day.
To set up an assisted base the RTK device should be located in a good reception area and provided with RTCM corrections. Let it obtain RTK Fix from a fixed position (on a tripod, for example) in Rover mode. Once an RTK fix is achieved, change the device to temporary Base mode (also called Survey-In). The device will take 60 seconds of positional readings, at which point the fixed position of the base will be set using RTK augmented coordinates. At this point, corrections provided to the base can be discontinued. The Base will begin outputting very accurate RTCM corrections that can be relayed to a rover that is in a less optimal reception setting.
Similarly, the RTK Facet L-Band can be set up as a relay: the L-Band device can be located in a good reception area, and then transmit very accurate corrections to a rover via Radio or internet link. Because the RTK Facet L-Band can generate its own corrections, you do not need to provide them during Survey-In. To set up an assisted base, set up an RTK Facet L-Band unit with a clear view of the sky, and let it obtain RTK Fix from a fixed position in Rover mode. Once an RTK fix is achieved, change the device to temporary Base mode. The device will take 60 seconds of positional readings, at which point the fixed position will be set using RTK fixed coordinates. The RTK Facet L-Band will then output very accurate RTCM corrections that can be relayed to a rover that is in a less optimal reception setting.